🎉 Announcing the new Puppeteer debugging site!

Joel Griffith
Joel Griffith
/
March 10, 2021

Without a doubt, one of the most helpful tools when working with any browser automation library is a visual debugger. We've written quite a bit about it. Since browserless is built specifically for developers, we're always striving to provide the best experience possible with debugging ⁠— and weren't satisfied with the state-of-the-art with the newer automation libraries. Simply put: headless: false isn't quite enough to debug Puppeteer, nor is any current live "REPL" out there.

Today, we're happy to announce that our complete re-write of the debugger is now live 🎉! It includes all the features we wanted in a debugger, and more.

The new REPL web-app 

Image of the new REPL web-app

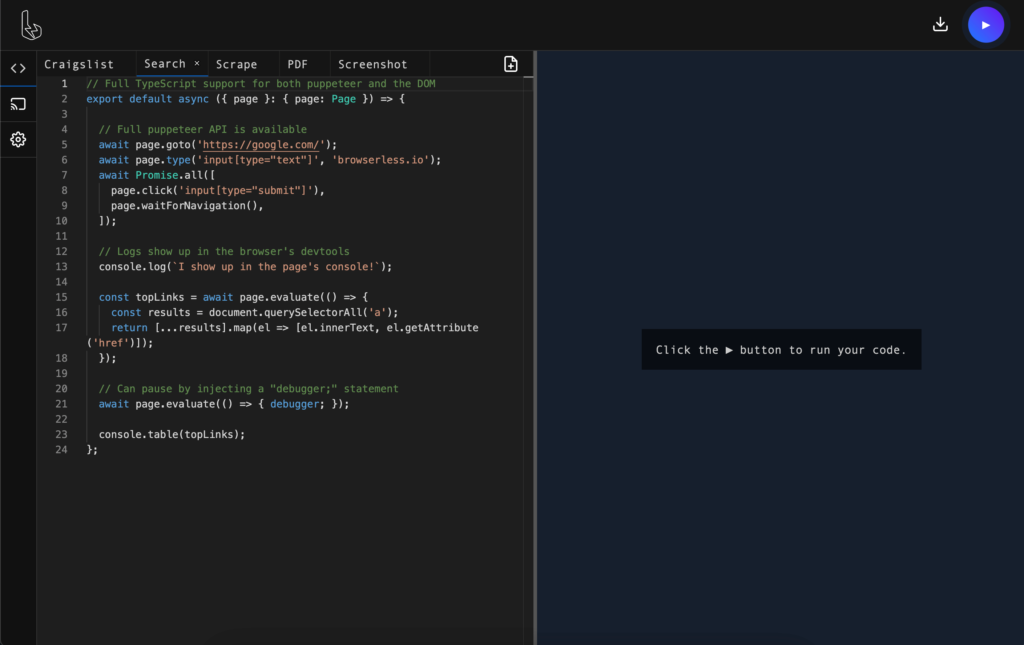
 We've been using this debugger internally for quite some time, and have found it incredibly useful. A short list of features include:

  • An editor with syntax highlighting and auto-complete.
  • Typescript support.
  • A visual screencast of the browser that you can interact with.
  • The ability to interact with the DevTools of the browser.
  • Downloading of files when needed, useful for testing PDFs/PNGs.
  • Ability to control browser-specific parameters like headless and stealth.
  • Tab-based layout with the ability to save your code.

Quite a bit of planning, research and development went into building this editor out. Since we found it to be such a useful tool, we also thought it'd be interesting to go over some of its core fundamentals and how we went about building it. Let me pause and say this before we get to far: if you do one thing today, just try out the debugger. If you do two things, read below on how we built it!

Building the editor

Without a doubt the most "useful" aspect of any debugger or REPL is the editing experience. Since we're big fans of VS-code, we decided to use the fantastic monaco-editor library that powers it. Getting monaco up and running with your favorite libraries can be somewhat of a hassle, so we scoped back the amount of packages that are typed to just two for now: node and puppeteer. Given that both of these packages have typings already, it's simply a matter of loading them into the editor. Doing so is fairly straightforward once you have your editor object setup, so that's our first step!

Editor Setup


// Setup the environment for typescript/javascript support
self.MonacoEnvironment = {
  getWorkerUrl: (_moduleId: any, label: string) => {
    if (label === 'typescript' || label === 'javascript') {
      return './ts.worker.bundle.js';
    }
    return './editor.worker.bundle.js';
  }
};

// Instantiate the editor
const editor = monaco.editor.create(document.getElementById('code'), {
  value: initialCode,
  language: 'typescript',
  theme: 'vs-dark',
  fontSize: 14,
  wordWrap: 'on',
  scrollBeyondLastLine: false,
  automaticLayout: true,
  minimap: {
    enabled: false
  }
});

Once setup, monaco has an API for injecting typings into it as well as the configuration for the TypeScript compiler. Setting up a new TS project is relatively straightforward:


// Specify that this is a node-like environment
monaco.languages.typescript.typescriptDefaults.setCompilerOptions({
  allowNonTsExtensions: true,
  target: monaco.languages.typescript.ScriptTarget.ES2020,
  moduleResolution: monaco.languages.typescript.ModuleResolutionKind.NodeJs,
  module: monaco.languages.typescript.ModuleKind.CommonJS,
});

Now that everything is setup it's simply a matter of loading our types into the editor. This part turned out to be a bit tricky, since monaco wants types as a plain-string property. Thankfully, we're using WebPack to bundle up the project, so "loading" these types is as simple as requiring them as raw files:


// First load the types as a plain string
const puppeteerTypes = require('!!raw-loader!puppeteer-core/lib/types.d.ts');

// ... later, add the puppeteer types into the editor
monaco.languages.typescript.typescriptDefaults.addExtraLib(
  puppeteerTypes.default,
  'node_modules/@types/puppeteer/index.d.ts',
);

For the purposes of our editor, we actually do some manipulation of the types so that they're globally exported (and don't need to be required). The full source can be found here, for those who want to see the whole project.

Building out the live viewer

Without a doubt, the second most helpful thing is actually seeing what the browser is up to ⁠— especially in the environment it's running in. We've seen cases where things worked just fine on local machines, but had issues in the cloud, so having the browser actually execute in the cloud was important to us for full transparency. To do this we reached into Chrome's DevTools Protocol to screencast frames of video directly back to your browser. This means that your browser is actually running the puppeteer code and viewing the session, meaning there's no other network hops being made.

To do this, we instantiate puppeteer's browser object inside of a WebWorker:


const browser = await puppeteer.connect({ browserWSEndpoint })
  .catch((error) => {
    console.error(error);
    throw error;
  });

const page = await browser.newPage();

// Use the page's client to start the screencast
const client = (page as any)._client as CDPSession;

await client.send('Page.startScreencast', { format: 'jpeg', quality: 100 });

// Wire up the screencast...
client.on('Page.screencastFrame', () => console.log("TODO"));

Now that we've got our browser and page boilerplate setup, it's just a matter of wiring up the screencast even so that we can draw it on the we-browser locally. Doing so isn't that complicated, however requires a bit of setup. For this particular case, we'll actually be drawing onto a <canvas> element inside the browser.


const $canvas = document.querySelector('#screencast')
const ctx = $canvas.getContext('2d');
const img = new Image();

onScreencastFrame(({ data }) => {
  img.onload = () => ctx.drawImage(img, 0, 0, $canvas.width, $canvas.height);
  img.src = 'data:image/png;base64,' + data;
});

Once both are all setup, you can do the following in the browser (assuming you have a <canvas id="screencast"> in your page):


const $canvas = document.querySelector('#screencast')
const ctx = $canvas.getContext('2d');
const img = new Image();
const browser = await puppeteer.connect({ browserWSEndpoint })
  .catch((error) => {
    console.error(error);
    throw error;
  });

const page = await browser.newPage();
const client = (page as any)._client as CDPSession;
await client.send('Page.startScreencast', { format: 'jpeg', quality: 100});

client.on('Page.screencastFrame', onScreencastFrame);

onScreencastFrame(({ data }) => {
  img.onload = () => ctx.drawImage(img, 0, 0, $canvas.width, $canvas.height);
  img.src = 'data:image/png;base64,' + data;
});

This really is just the start: we don't talk much about how keyboard and mouse events are handled, but if you want to see the full code feel free to do so here.

Handling downloads

The last bit of work is handling downloads: things that your code might run that produces some kind of static asset like a PDF or PNG file. To do that, we had to get a one more library in the project to help us out: file-type. This module, at its core, accepts a binary blob of some kind and tells us what it is. For us this mostly helps the editor to discern from PDF and PNG images, but can potentially be expanded to other formats as well.

Once the page's code has ran, we look at what the script returns and make an educated guess as to what's supposed to happen. Since this is all being ran inside a WebWorker, we can eval the code with some sand-boxing. Remember: this is all ran inside the user's browser inside a WebWorker so while it's generally a bad idea to eval most of the time, we made an exception here.


const browser = await puppeteer.connect({ browserWSEndpoint });
const page = await browser.newPage();

// Code is written in an encapsulated function, so we invoke it with the
// proper arguments in order for it to run.
eval(code)({ page })
  .then(async (res: any) => {
    // Need to handle res here as it could be anything the function returns...
  })
  .catch((e: Error) => {
    // Inject errors into the page so that they show up in the cloud browser's devtools... neat!
    page && page.evaluate((err) => console.error(err), e.toString());
  });

For handling of downloads, we have a pretty simple function that checks what it is:


import FileType from 'file-type/browser';

async function makeDownload(response?: string | Uint8Array): Promise < {
  type: string,
  payload: any,
} | null > {
  // Nothing being returned triggers no actions
  if (!response) {
    return null;
  }

  // PDF/PNG are Uint8Arrays in the browser
  // If no type is determined, don't do anything
  if (response instanceof Uint8Array) {
    const type = (await FileType.fromBuffer(response) || { mime: undefined }).mime;
    if (!type) {
      return null;
    }
    return { type, payload: response};
  }

  // Here we check for page.content responses (html) via a simple check that it starts with the "< " character
  if (typeof response === 'string') {
    return {
      type: response.startsWith('< ') ? 'text/html' : 'text/plain',
      payload: response,
    }
  }

  // Check if it's a JSON blob that we should download instead
  if (typeof response === 'object') {
    return {
      type: 'application/json',
      payload: JSON.stringify(response, null, '  '),
    };
  }

  return {
    type: 'text/plain',
    payload: response,
  };
}

Finally, once we have the type of file that's being returned, we can trigger the browser to download it:


import FileType from 'file-type/browser';
import pupeteer from 'puppeteer';

const browser = await puppeteer.connect({ browserWSEndpoint });
const page = await browser.newPage();

async function makeDownload(response?: string | Uint8Array): Promise< { type: string, payload: any} | null> {
  if (!response) {
    return null;
  }

  if (response instanceof Uint8Array) {
    const type = (await FileType.fromBuffer(response) || { mime: undefined }).mime;
    if (!type) {
      return null;
    }
    return { type, payload: response};
  }

  if (typeof response === 'string') {
    return {
      type: response.startsWith('< ') ? 'text/html' : 'text/plain',
      payload: response,
    }
  }

  if (typeof response === 'object') {
    return {
      type: 'application/json',
      payload: JSON.stringify(response, null, '  '),
    };
  }

  return {
    type: 'text/plain',
    payload: response,
  };
}

const downloadFile = (download) => {
  const fileName = 'my-download';
  const blob = new Blob([download.payload], { type: download.type });
  const link = document.createElement('a');

  link.href = window.URL.createObjectURL(blob);
  link.download = fileName;

  return link.click();
};

eval(code)({ page })
  .then(async (res: any) => {
    const payload = makeDownload(res);
    if (payload) {
      downloadFile(payload);
    }
  })
  .catch((e: Error) => {
    page && page.evaluate((err) => console.error(err), e.toString());
  });

Much more in the repo!

While this is just a highlight of some of the technologies we used to build the live debugger, there's a lot more that went into the project. We didn't touch upon our tab implementation, how we load puppeteer into the browser, or even how we save your code! You should definitely check out the repo and see the whole project in its glory. Finally, you should definitely check out our debugger, and make use of it when something isn't working properly in your headless workloads.

Share this article

Ready to try the benefits of Browserless?

Sign Up