Introduction
Headless automation is becoming increasingly demanding, and it's often hard to understand what the browser is doing when something breaks or behaves unexpectedly. Clear insight and steady control make a noticeable difference when debugging or maintaining long-running workflows. In this guide, you'll walk through how Browserless supports Chrome Extensions in automated sessions, records full runs with Session Replay, keeps state with Persistent Sessions, and lets you reconnect to active sessions whenever work needs to continue.
Session Replay
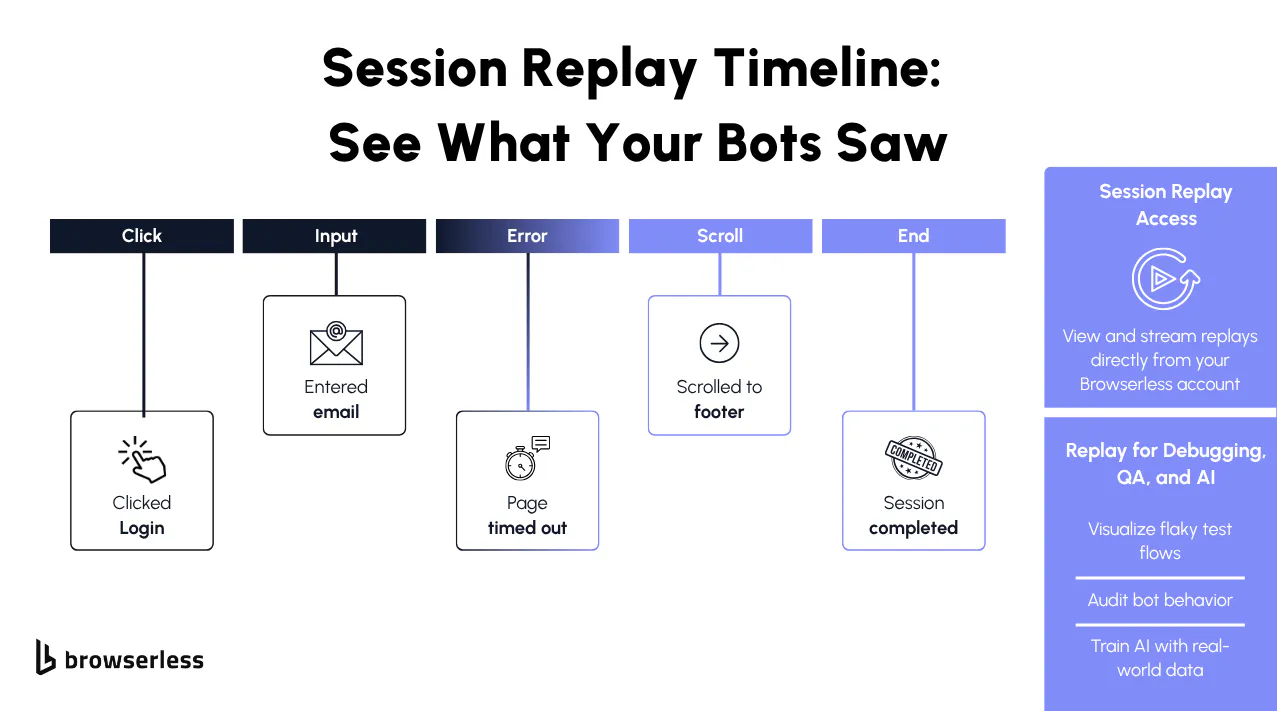
Session Replay lets you watch your automation sessions as if you were sitting in front of the browser when they ran. Instead of relying on logs or guessing why something behaved unexpectedly, you can see the exact sequence of events.
This becomes especially valuable when working with UI-driven automation, where timing, layout shifts, and DOM changes can cause subtle failures that are hard to reproduce by hand.
Developers use Replay to understand how their scripts behave in real environments, confirm that UI flows still work after refactoring, and validate automated tests that depend on visual accuracy. It's also an excellent way to share debugging context with teammates because the recording shows exactly what happened.
Enabling Replay with BrowserQL
Replay is activated by adding a replay flag to your BrowserQL endpoint. Once enabled, every action your BQL mutation performs is recorded from start to finish.
This makes it simple to capture deterministic sequences, scripted navigations, or multi-step flows without maintaining a long-lived Puppeteer connection.
Here's the endpoint setup as long as your BROWSERLESS_TOKEN is available in your environment, Browserless knows who you are and where to store your session.
const API_KEY = process.env.BROWSERLESS_TOKEN;
const BQL_ENDPOINT = `https://production-sfo.browserless.io/chromium/bql?replay=true&token=${API_KEY}`;
Replay begins the moment Browserless starts executing your query.
Defining the Actions You Want to Record
The example below shows a small workflow that demonstrates how Replay captures navigation, interactions, and timings. It loads a page, performs a click, and pauses briefly to allow the UI to update. These kinds of steps are very common in automated testing, onboarding flows, data extraction tasks, and interactive walkthroughs.
const recordingQuery = `
  mutation {
    goto(url: "https://www.browserless.io") { time }
    click(selector: "a") { time }
    waitForTimeout(time: 2000) { time }
  }`;
Each step returns a timestamp, which corresponds to the event timeline in your dashboard. This makes it easy to follow the flow and see exactly when each action occurred.
Running the Recording
The script below sends the BQL mutation to Browserless. Once the request is made, Browserless executes the workflow and records everything until the mutation ends. This kind of recording works well for verifying user flows, capturing regressions, or documenting how your automation behaves at runtime.
import fetch from "node-fetch";

async function recordSession() {
  if (!API_KEY) {
    throw new Error("Set BROWSERLESS_TOKEN in your environment first.");
  }

  const response = await fetch(BQL_ENDPOINT, {
    method: "POST",
    headers: { "Content-Type": "application/json" },
    body: JSON.stringify({ query: recordingQuery }),
  });

  const result = await response.json();

  if (!response.ok || result.errors) {
    throw new Error("Replay recording failed.");
  }

  console.log("Replay session recorded.");
  console.log("Open the Browserless dashboard to view the recording.");
}

recordSession();
This is useful when you want to script repeatable actions that always behave consistently. Because BrowserQL executes each step in sequence, the recording naturally becomes a reliable reference for debugging or validating changes.
Viewing the Recording
When the script finishes, your replay appears in the Browserless Session Repeat dashboard. You can scrub through the session like a video, pause at key moments, and see the exact state of the page's console and network events at any point in time.
Developers often use Replay to catch layout shifts, verify visual elements, confirm that scripts triggered the correct interactions, and observe how pages render under real network conditions.
Whether you're tuning performance, fixing brittle selectors, reviewing UI state, or double-checking a workflow before deployment, Replay offers a clear window into what actually happened inside the browser. It gives you the confidence that your automation is behaving as you expect, and the tools to investigate thoroughly when it doesn't.
Persistent Sessions (Session API)
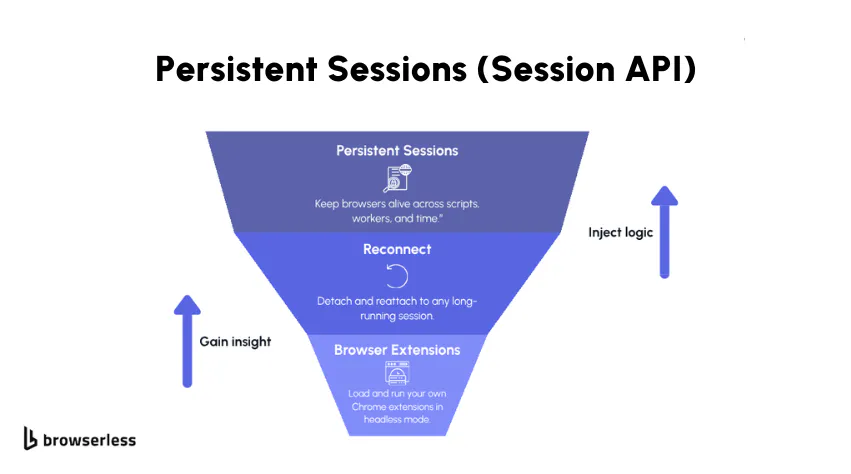
Sometimes automation doesn't happen in one clean pass. You might have a workflow that runs in stages. Or maybe one script logs in and sets up state, and another script needs to pick up right where the first one left off; this is where Browserless Persistent Sessions helps.
Instead of discarding browser state when your script finishes (as REST endpoints like /pdf or /screenshot do), persistent sessions preserve the browser profile and session state so it can be reused across connections by using automation libraries like Puppeteer or Playwright. This behavior is specific to Persistent Sessions created via the /session API and is different from standard BaaS reconnect, which does not persist browser profiles across different browser sessions.
That means your session's cookies, storage, and other browser states are preserved and restored when you connect to that session, until the session expires or you explicitly end it. Note that the browser doesn't necessarily need to stay open with this method.
It removes repetitive setup work, avoids re-authentication loops, and makes multi-step automation feel much smoother. If your automation runs across multiple processes or workers, persistent sessions let each part connect, do its job, close, and allow you to open that browser session again. The browser process itself may shut down between connections, but it will be launched using the same preserved profile.
How Browserless Persistent Sessions Work (Session API)
Everything starts with the /session API; when you ask Browserless to create a new session, it hands you back a small bundle of URLs that give you full control over that browser instance. These URLs remain active until the session expires or you explicitly end it.
Here's what you get:
- id – your session's unique identifier
- connect – a WebSocket endpoint your automation can attach to
- stop – a URL you can call to shut the session down
- browserQL – an endpoint for issuing BrowserQL queries (available when using stealth mode)
Once you have these URLs, you can launch a browser with that session whenever you need to. As long as the session is still active, you can launch a browser with the persisted data and pick up where things left off.
Let's walk through what that looks like with real code.
To begin, you create the session and grab its connection details:
import fetch from "node-fetch";
import puppeteer from "puppeteer";

const TOKEN = process.env.BROWSERLESS_TOKEN;

const createSession = async () => {
  const response = await fetch(
    `https://production-sfo.browserless.io/session?token=${TOKEN}`,
    { method: "POST" },
  );

  if (!response.ok) {
    throw new Error("Failed to create session");
  }

  return response.json();
};
With the session created, you can attach a Puppeteer client to it just like you would with any WebSocket-based browser connection.
const session = await createSession();

const browser = await puppeteer.connect({
  browserWSEndpoint: session.connect,
});

const page = await browser.newPage();
await page.goto("https://example.com");

// Store some state we can verify later
await page.evaluate(() => localStorage.setItem("preserved", "yes"));
Now here's the key part. When you close the browser, the session's browser profile and state are preserved. This is what makes the session 'persistent.'
await browser.close();
You can reconnect using the same connect URL seconds, minutes or even days later. The browser is launched with the same preserved state, so no setup or authentication is required.
const reconnected = await puppeteer.connect({
  browserWSEndpoint: session.connect,
});

const restoredPage = (await reconnected.pages())[0];

// Load the page so we can check our stored data
await restoredPage.goto("https://example.com");

const stored = await restoredPage.evaluate(() => localStorage.getItem("preserved"));
console.log("LocalStorage persisted:", stored);
And once you're finished with the session, you can cleanly shut everything down.
await reconnected.close();
Reusing the Session
Reattaching to a persistent session is as simple as calling puppeteer.connect() again with the same WebSocket URL. As long as the session's TTL hasn't expired and you haven't used the stop endpoint, the session state is preserved between runs.
This makes persistent sessions a perfect fit for workflows that need continuity: authenticated sequences, multi-phase data collection, complex onboarding flows, or anything where keeping in-browser state between executions saves you time and headaches.
Reconnect
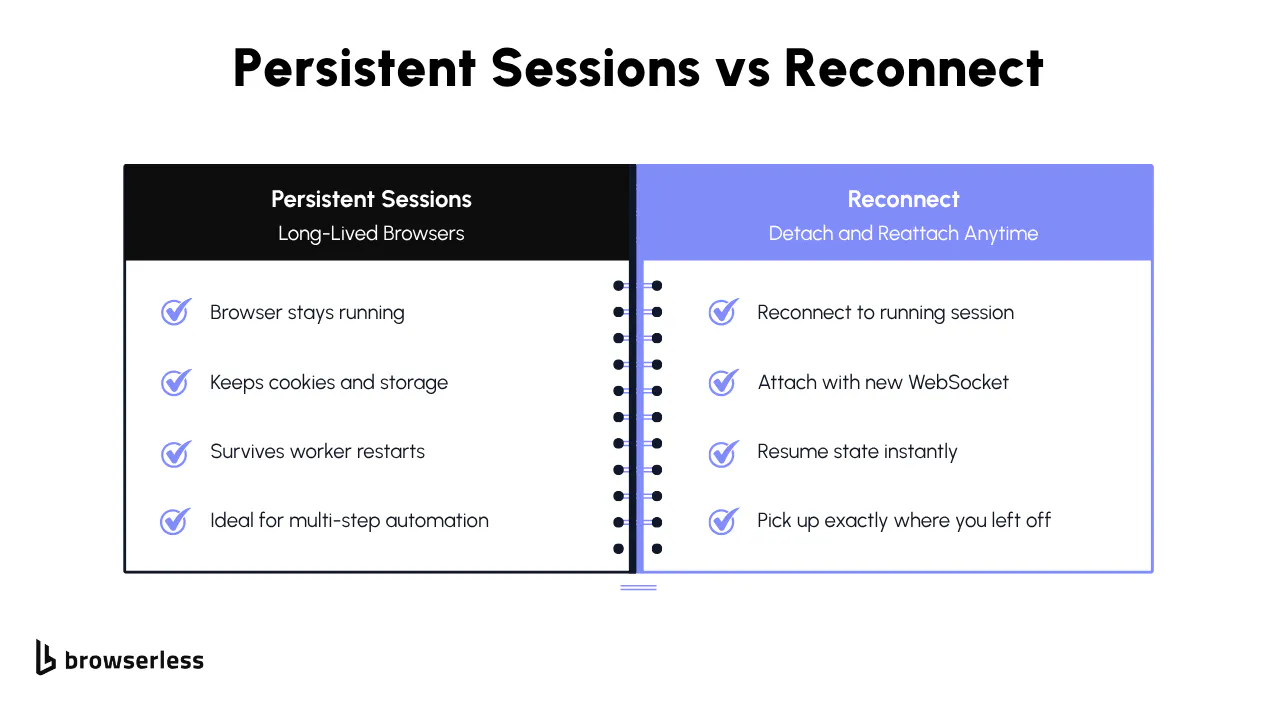
At times, your automation needs to pause without losing its place. Maybe a worker restarts. One script sets up the environment, and another finishes the job. Perhaps you just can't keep a long-lived Puppeteer connection open. Reconnect works with standard Browserless BaaS sessions and does not require the Session API or persistent browser profiles.
That's precisely what Reconnect is built for: when your script disconnects, the browser continues running temporarily so you can reattach without restarting the session. Tabs stay alive, and the in-memory state remains available while the browser is still running. And when you're ready to jump back in, you simply attach again and continue exactly where you left off.
It's a small feature with a huge impact on multi-stage automation, distributed systems, or anything that needs continuity without a permanent connection. For long-term state persistence across multiple browser launches, use Persistent Sessions via the Session API instead.
How Reconnect Works
Reconnect allows your automation to temporarily detach from a running browser and reattach later without restarting it. Reconnect does not require the Session API or persistent sessions and works with standard Browserless BaaS connections and BrowserQL workflows.
You begin by connecting to Browserless as usual and performing any setup your automation needs, such as logging in, navigating pages, or preparing an in-memory state.
import puppeteer from "puppeteer";

const browser = await puppeteer.connect({
  browserWSEndpoint: `wss://production-sfo.browserless.io?token=${TOKEN}`,
});

const page = await browser.newPage();
await page.goto("https://example.com");
Once your setup is complete, you can detach from the browser without closing it. The browser continues running on Browserless while your script disconnects.
When you disconnect, the browser websocket connection detaches, but the browser is still running, waiting to be reconnected to.
await browser.disconnect();
To reconnect, request a new WebSocket endpoint from Browserless. This can be done in two ways, depending on how you are interacting with the browser.
Reconnect via CDP (Puppeteer / Playwright)
For standard BaaS connections, use the Browserless.reconnect CDP command. Browserless keeps the browser alive temporarily and returns a new WebSocket endpoint, allowing your automation to reattach.
const cdp = await page.target().createCDPSession();

const { browserWSEndpoint } = await cdp.send("Browserless.reconnect", {
  timeout: 60000,
});

const reconnected = await puppeteer.connect({
  browserWSEndpoint,
});
Reconnect via BrowserQL
BrowserQL workflows can use the reconnect mutation to achieve the same result. The mutation returns new endpoints that allow you to reattach to the same running browser.
const res = await fetch(BQL_ENDPOINT, {
  method: "POST",
  headers: { "Content-Type": "application/json" },
  body: JSON.stringify({
    query: `
      mutation {
        reconnect(timeout: 60000) {
          browserWSEndpoint
          browserQLEndpoint
        }
      }
    `,
  }),
});

const gql = await res.json();
const newWSEndpoint = gql.data.reconnect.browserWSEndpoint;

const reconnected = await puppeteer.connect({
  browserWSEndpoint: newWSEndpoint,
});
After reconnecting, you are attached to the same running browser instance. Tabs remain open, in-memory state is preserved, and your automation can continue from where it left off without restarting the browser or repeating setup steps.
When Reconnect Helps
Reconnect is incredibly helpful when your automation requires a momentary pause for some feedback before continuing.
One script might perform a login flow, and disconnect until the user provides a 2FA code. Then, a second script might reconnect to continue the workflow and enter that 2FA code.
It also shines in environments where things don't last long, such as serverless functions, containerized workers, or job queues. It's common to see no-code or low-code tools have short timeouts for HTTP requests, so with the reconnect feature, you can break up the process in multiple steps to work around it.
Chrome Extensions in Browserless
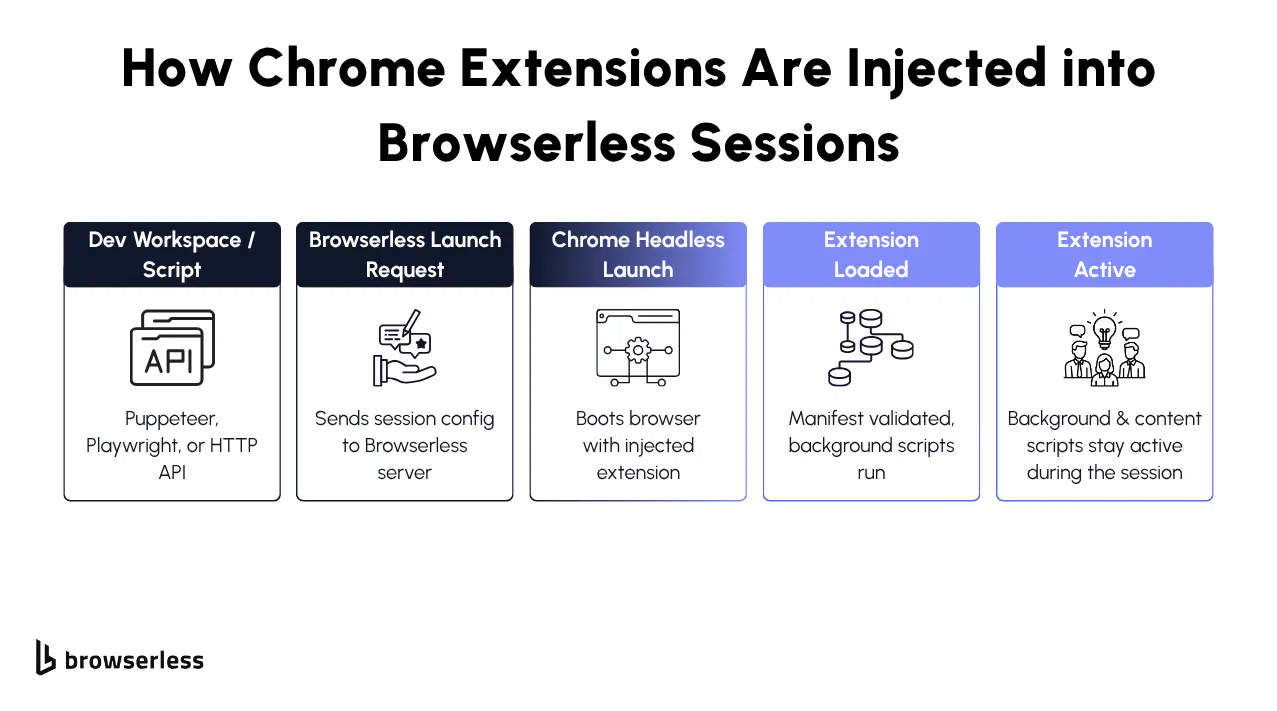
Chrome Extensions give you a way to load logic directly inside the browser before your script runs, before a page loads, and across every navigation. In automation, this opens the door to workflows that are difficult or messy to achieve with page-level scripts alone.
Browserless loads your extension the moment the session starts, so the browser environment is already configured and "pre-instrumented" before your automation interacts with anything.
This means you can enforce rules, monitor events, modify pages, or maintain state across tabs and navigations without having to write the same setup code in every script.
Background scripts, service workers, and content scripts remain active throughout the session, providing a stable, predictable environment end-to-end.
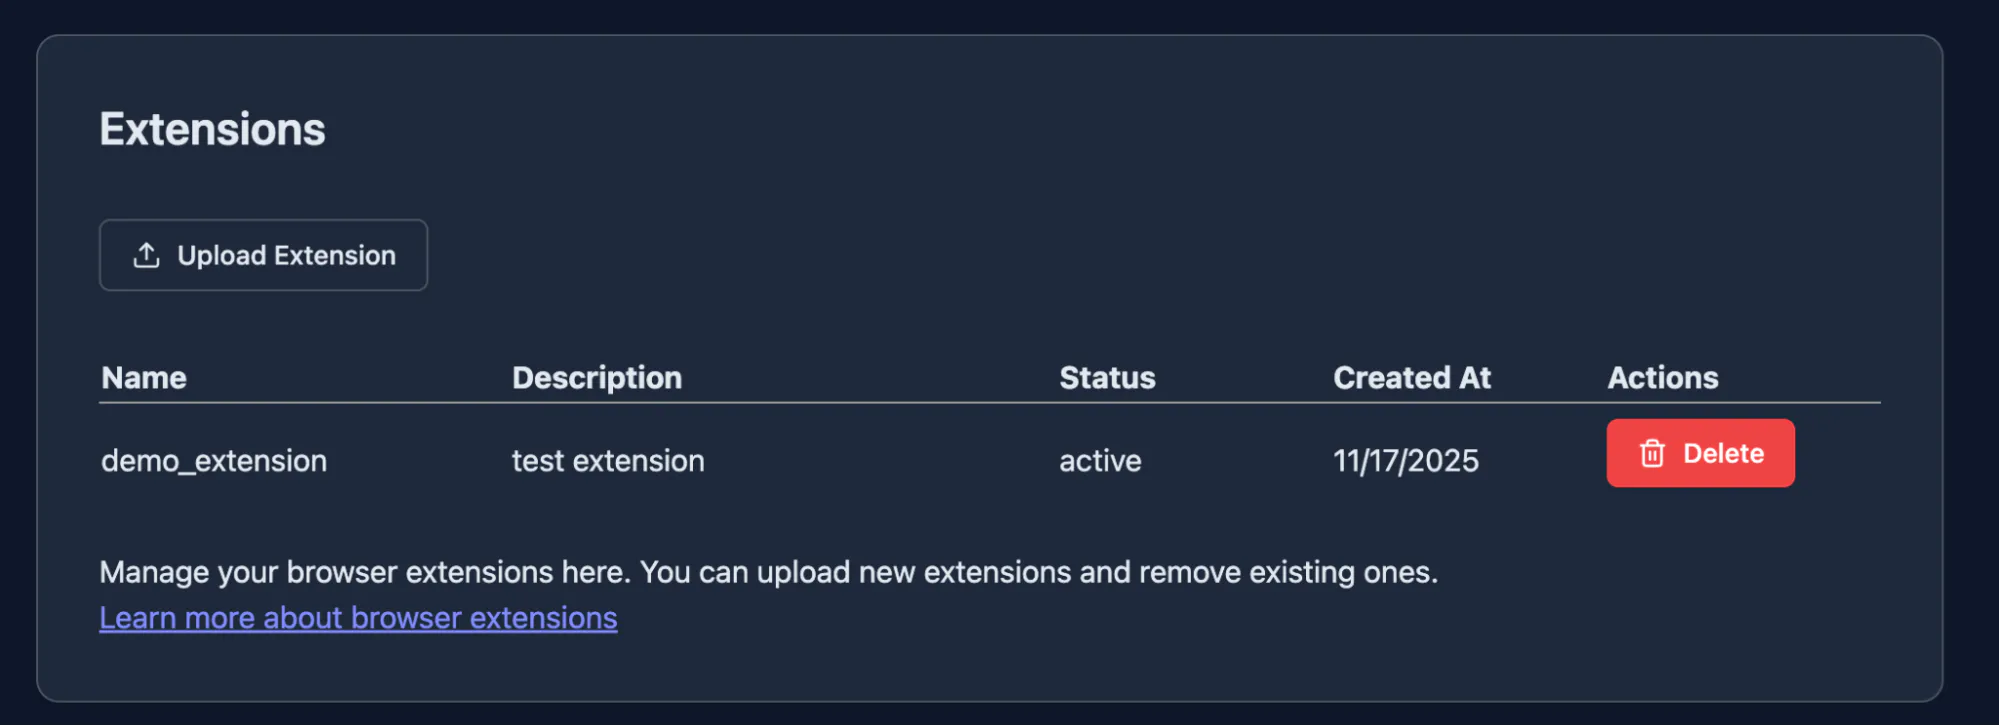
How Extensions Work in Browserless
First, you upload a ZIP of your Chrome extension to the Browserless extension dashboard. Once it's uploaded, it appears in your extension list under the name you specified in your launch configuration.
From there, enabling an extension in a session is as simple as adding it to your launch options:
const launchArgs = {
  extensions: ["demo_extension"], // must match the name in your dashboard
};
This tells Browserless: "Start Chromium and preload this extension before anything else happens." No installation. No manual loading. No adding CRX files. The browser boots up with your extension already injected and ready.
Connecting to Browserless With an Extension Enabled
Once you have your launch config, pass it into your WebSocket connection:
const query = new URLSearchParams({
  token: TOKEN,
  timeout: "180000",
  launch: JSON.stringify(launchArgs),
});
Then connect using Puppeteer:
const browser = await puppeteer.connect({
  browserWSEndpoint: `wss://production-sfo.browserless.io?${query.toString()}`,
});
At this point, the extension is already active; anything defined in your manifest background scripts, listeners, and content scripts has been loaded. You're now inside a browser that behaves exactly the way you designed it to.
Testing the Extension in Action
If you're using the Browserless demo extension from the browser extension upload screen.
You can verify it by navigating to a site and checking if the injected text appears:
const page = await browser.newPage();
await page.goto("https://example.com");

const injected = await page.evaluate(() => {
  return document.body.textContent.includes("Hello from extension");
});

console.log("Extension injected text? →", injected);
If injected is true, it means the extension successfully modified the page. That's proof your automation is no longer running in a raw browser environment; it's running in a custom, configured, pre-instrumented environment that you control.
What You Can Actually Do With This
The demo is just a sanity check. The power comes when you replace it with real logic. Developers typically use extensions in headless automation for things like:
- Enforcing security, blocking, or filtering rules (e.g., blocking trackers, removing popups).
- Running logic on every navigation, without manually calling page.evaluate each time.
- Injecting credentials, tokens, or custom headers via background listeners.
- Overriding or modifying network requests (e.g., rerouting APIs, mocking responses).
- Maintaining state across tabs/pages without re-implementing logic in each script.
- Ensuring consistency across large automation workflows by setting up the browser one time instead of per script.
Think of the extension as a "global middleware layer" for your browser automation. Your Puppeteer script becomes simpler, cleaner, and free from repeated plumbing.
Extension Requirements to Remember
Extensions follow standard Chrome rules; they must be valid Manifest v2 or v3 extensions and uploaded as a ZIP file with the correct structure. Only background logic and content scripts run in headless mode.
UI elements such as popups or action buttons won't appear because Browserless doesn't render a visible UI. And keep in mind that extension loading happens only at browser startup, so you must include it in your launch options from the beginning.
Conclusion
Automation gets much easier when the browser is transparent and you can control how each session behaves. Extensions give you the environment you need, Replay shows what actually happened during a run, Persistent Sessions let you return to an existing browser state, and Reconnect keeps long-lived work stable even when your scripts restart. Together, these features reduce guesswork and create a workflow that's more predictable and easier to improve.
Kick off a free trial and experience extensions, replay, persistence, and reconnect working together in real sessions.
FAQs
Can I use Chrome extensions?
Yes. Upload your extension via the dashboard or the API, then include its ID in launch.extensions when starting a session. Background scripts and service workers run normally in headless mode. UI-based features like popups, browser actions, or page action buttons won't appear, so extensions should rely on non-UI logic.
What does replay capture?
Replay records the full session timeline, including navigation, interactions, DOM updates, and timing. When the session ends, the recording is available in the dashboard and streams directly in the browser. This helps track down issues with selectors, timing, rendering, or unexpected page behavior without rerunning the script.
Do persistent sessions keep browser state?
Yes. A persistent session maintains its state throughout its active lifetime. When you reconnect using the provided connect endpoint, the browser continues with the same data, storage, and context it held when you last detached. The session only resets when it expires or you call the stop endpoint.
How do I reconnect to a running session?
Use the BrowserQL reconnect(timeout) mutation. It keeps the browser alive after your script disconnects and returns a new WebSocket endpoint for the next attachment. Connecting through that endpoint attaches your automation to the same running session without launching a new browser instance.
Can I use Playwright instead of Puppeteer?
Yes. Playwright works the same way as Puppeteer when connecting to Browserless. Use the connect endpoint provided by the Session API or the new endpoint returned by reconnect(timeout).
Is there a limit on how long a session can stay active?
Session duration depends on the TTL you configure when creating the session. As long as the session hasn't expired or been stopped, you can keep reconnecting to it. Once the TTL runs out, Browserless terminates the session automatically.
Can multiple scripts connect to the same session?
Multiple scripts can attach to the same session at different times through disconnecting and reconnecting. You can disconnect one script and attach another using the same connect or reconnect endpoint. This allows work to be handed off between processes or workflow stages.
Does replay affect performance?
Replay adds a small overhead because Browserless captures visual updates and session metadata. It's generally safe for development and debugging. For heavy production workloads, you can disable replay unless you need the session recording.