Playwright is an excellent tool for browser automation — and when you combine it with Azure Functions App, it offers a serverless method to conduct this process. Even though there are several benefits like Azure’s scalable infrastructure and faster feedback loop, it has limitations such as:
- Limited browser support
- Resource limitations
- Need for continuous monitoring and updates
You'll get instructions to either connect to an existing browser pool, or how to host one yourself.
First, we’ll create an Azure function with a consumption plan on a Linux environment.
We’ll also use Playwright-core with the Chromium browser from Sparticuz to reduce the deployment size, or use Browserless.
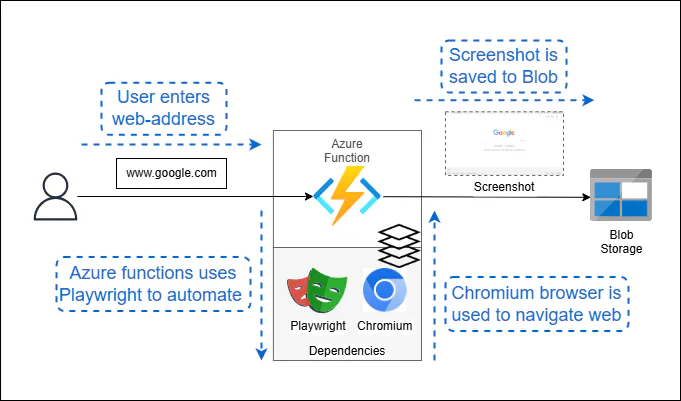
In this case, we'll design a function that takes a screenshot using Playwright and uses a website's URL as input. The function visits the website, captures a screenshot, and saves it to a blob storage.
The goal is to verify that the function works as intended.
Step 1: Install dependencies
You need to install Playwright as a dependency on the Azure Functions App. Navigate to the Azure function directory and use the commands below to install it:
cd /path/to/your/azure-function-project
npm init -y
npm install playwright-core @azure/storage-blob
This also installs the Azure Storage Blob SDK, a required dependency. It stores the screenshot in the blob storage.
The package.json file lists all the dependencies. It gets created automatically when you install the dependencies. The version number can be different for your function, but here’s what it looks like
{
  "name": "azure-function-project",
  "version": "1.0.0",
  "description": "",
  "main": "index.js",
  "scripts": {
    "test": "echo \"Error: no test specified\" && exit 1"
  },
  "keywords": [],
  "author": "",
  "license": "ISC",
  "dependencies": {
    "@azure/storage-blob": "^12.13.0",
    "playwright-core": "^1.30.0"
  }
}
Step 2: Download Chromium
We’ll use the version of playwright-core that comes without Chrome. So, we’ll have to download Chrome manually and provide the path under the executablePath variable.
Here’s how you can do that:
- Use the GitHub - Sparticuz/chromium: Chromium (x86-64) for Serverless Platforms to download the chromium.
- Use the command below to download the files and the makefile in the repository to create binaries.
- Shift those binaries to the project folder and note their path for later use in the main code.
git clone --depth=1 https://github.com/Sparticuz/chromium.git
cd chromium
make chromium
Step 2 Alternative: Connect to Browserless
With Browserless, there’s no need to manage Chrome versions and memory leaks. All you need to do is change the connection to point to our managed browsers.
The docs include instructions for each language, such as this JavaScript example with a screenshot:
import playwright from "playwright-core";

const pwEndpoint = `wss://production-sfo.browserless.io/firefox/playwright?token=GOES-HERE`;
const browser = await playwright.firefox.connect(pwEndpoint);
const context = await browser.newContext();
const page = await context.newPage();

await page.goto("https://www.nexcess.net/web-tools/browser-information/");
await sleep(50000);
await page.screenshot({
  path: `firefox.png`,
});

await browser.close();
You can use Browserless either via our hosted service or with our open source container.
Step 3: Write the Azure Function
You can create Azure functions using its console with Node.js runtime. To run it, allocate 512 MB RAM at minimum. Also, implement a default timeout of five minutes—and increase it up to ten minutes if needed.
Here’s the code index.js:
const { chromium } = require("playwright-core");
const { BlobServiceClient } = require("@azure/storage-blob");
const path = require("path");

// Azure Storage connection string
const AZURE_STORAGE_CONNECTION_STRING = process.env.AZURE_STORAGE_CONNECTION_STRING;
const CONTAINER_NAME = "screenshots";

module.exports = async function (context, req) {
  const containerName = CONTAINER_NAME;
  const url = req.query.url || "https://www.google.com";
  const parsedUrl = new URL(url);
  const hostname = parsedUrl.hostname;

  try {
    // Launch a headless Chromium browser using Playwright-core
    const browser = await chromium.launch({
      executablePath: path.resolve("/path/to/downloaded/chromium"),
      args: ["--no-sandbox", "--disable-setuid-sandbox"],
      headless: true,
    });

    const page = await browser.newPage();
    await page.goto(url);
    const screenshotBuffer = await page.screenshot();
    await browser.close();

    const blobServiceClient = BlobServiceClient.fromConnectionString(
      AZURE_STORAGE_CONNECTION_STRING,
    );
    const containerClient = blobServiceClient.getContainerClient(containerName);
    const blobName = `${hostname}.png`;
    const blockBlobClient = containerClient.getBlockBlobClient(blobName);
    await blockBlobClient.upload(screenshotBuffer, screenshotBuffer.length);

    context.log("Screenshot uploaded to Azure Blob Storage");
    context.res = {
      status: 200,
      body: "Screenshot uploaded to Azure Blob Storage",
    };
  } catch (error) {
    context.log.error("Error:", error);
    context.res = {
      status: 500,
      body: "Error occurred while taking screenshot and uploading to Azure Blob Storage",
    };
  }
};
Step 4: Trigger and test the code
Trigger the code using the Azure console test/run button, and input the website's name.
The code above uses google.com as the default input if you don’t provide one. If the function runs successfully, the website’s screenshot gets stored in the blob storage.
Let us handle the browser complexities
If you want to avoid working with a solution that needs round-the-clock monitoring, potential compatibility issues, and resource limitations, try Browserless.
Using our managed pool of concurrent browsers, you can avoid these constraints and do much more. Let us manage the browser while you focus on the outcomes of these functions.
Take it for a test drive using the free account.