Key Takeaways
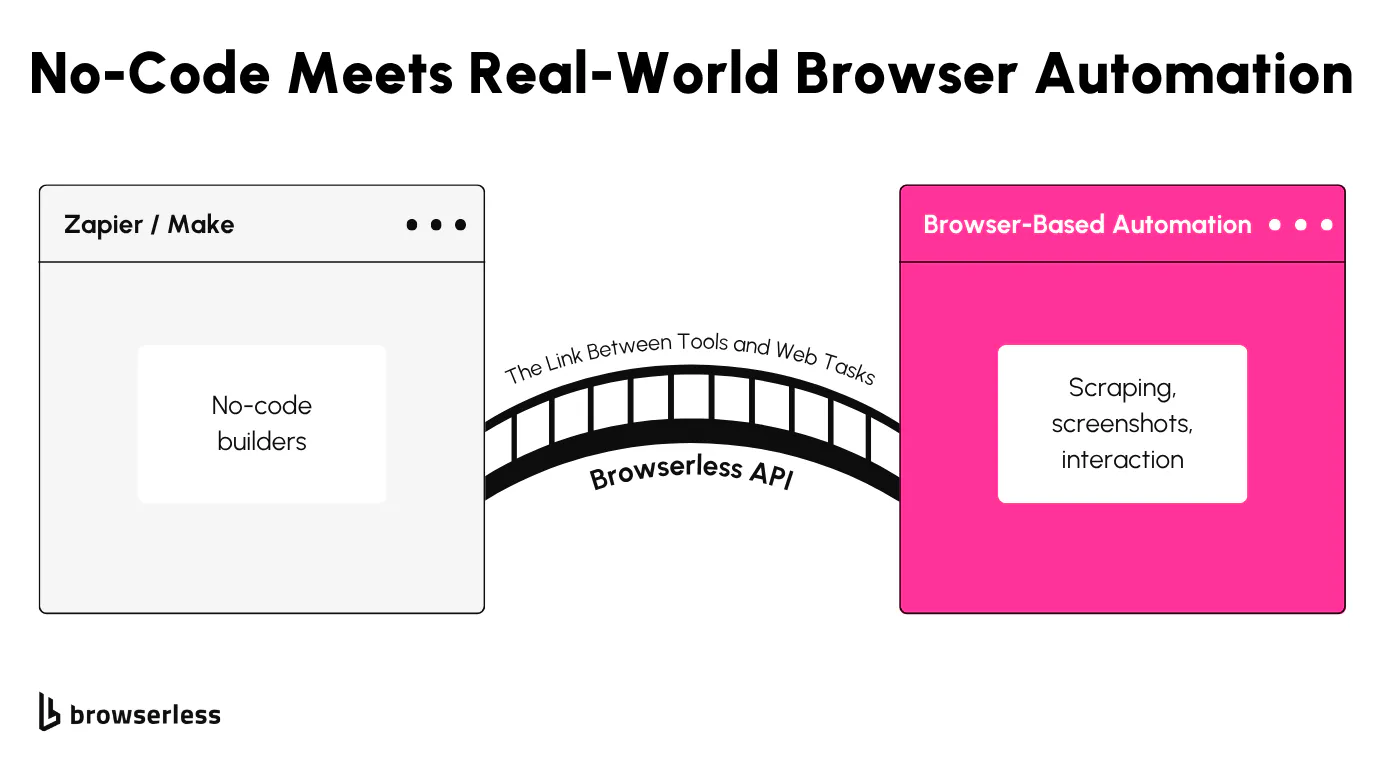
- Browserless bridges no-code tools with real browser automation: You can trigger full browser sessions from platforms like Zapier and Make using Browserless APIs. This allows non-developers to run tasks such as taking screenshots or DOM scraping without writing or hosting backend code.
- Make and Zapier handle dynamic websites through Browserless: Both tools support HTTP modules or webhook actions, which can call Browserless’s screenshot or BQL endpoints to interact with modern JavaScript-heavy pages that static scrapers can’t handle.
- You get real automation with privacy and scale: Every Browserless session runs in a clean, disposable Chrome container. No sessions are reused, making automation safer for tasks like product tracking, UI monitoring, and form interactions even on sites with bot detection.
Introduction
Web automation isn’t just for developers anymore. Platforms like Zapier and Make enable you to connect services and build workflows using simple visual interfaces. You can set up triggers, define actions, and automate routine tasks without writing a line of code. Browserless brings real browser capabilities into this mix. It’s a cloud-based API that enables you to control headless Chrome sessions to take screenshots, extract data, or interact with forms, just as a real user would. In this article, you’ll build two automations one in Zapier, one in Make that use Browserless to interact with live websites in a way that’s fast, accurate, and doesn’t require deploying a backend.
Tool Setup: What You Need
Before building your first automation, you’ll need a few accounts and one API key. Both Zapier and Make are online platforms that let you build workflows by connecting services with triggers and actions. You don’t need to install anything, just sign up, log in, and you’re ready to start wiring steps together visually.
You’ll also need a Browserless account. Browserless gives you API access to real Chrome sessions running in the cloud. With it, you can take screenshots, extract data, or submit forms as if you were manually navigating a browser. After signing up at browserless.io, you’ll receive an API key that authenticates your requests to their cloud services.
Once you have those two pieces, the next step is to learn how both Zapier and Make utilize webhooks. Webhooks are a way to send custom HTTP requests from inside an automation. In this case, they’ll be used to send POST requests directly to Browserless APIs. Zapier has a “Webhooks by Zapier” action, and Make has an HTTP module both allow you to control the method, headers, and body of each request.
Each platform has its flow model, but the logic is nearly identical. In Zapier, you start with a trigger, such as a schedule or form submission, and then pass data through to a webhook step.
In Make, you build a scenario that visually chains steps, including conditions and parameters as needed. Both can call any Browserless endpoint, whether it's the screenshot API or a custom BQL query.
If you want to skip setup and see working examples, Browserless provides API documentation with payload samples.
Example #1: Take a Website Screenshot with Zapier
Let’s say you want to keep tabs on how eBay displays search results for something popular like “Nintendo Switch.” The listings change constantly: sellers come and go, promotions rotate, and sometimes entire sections fail to load. If you’re an affiliate, seller, or just curious, screenshots can give you visibility that scraping can’t.
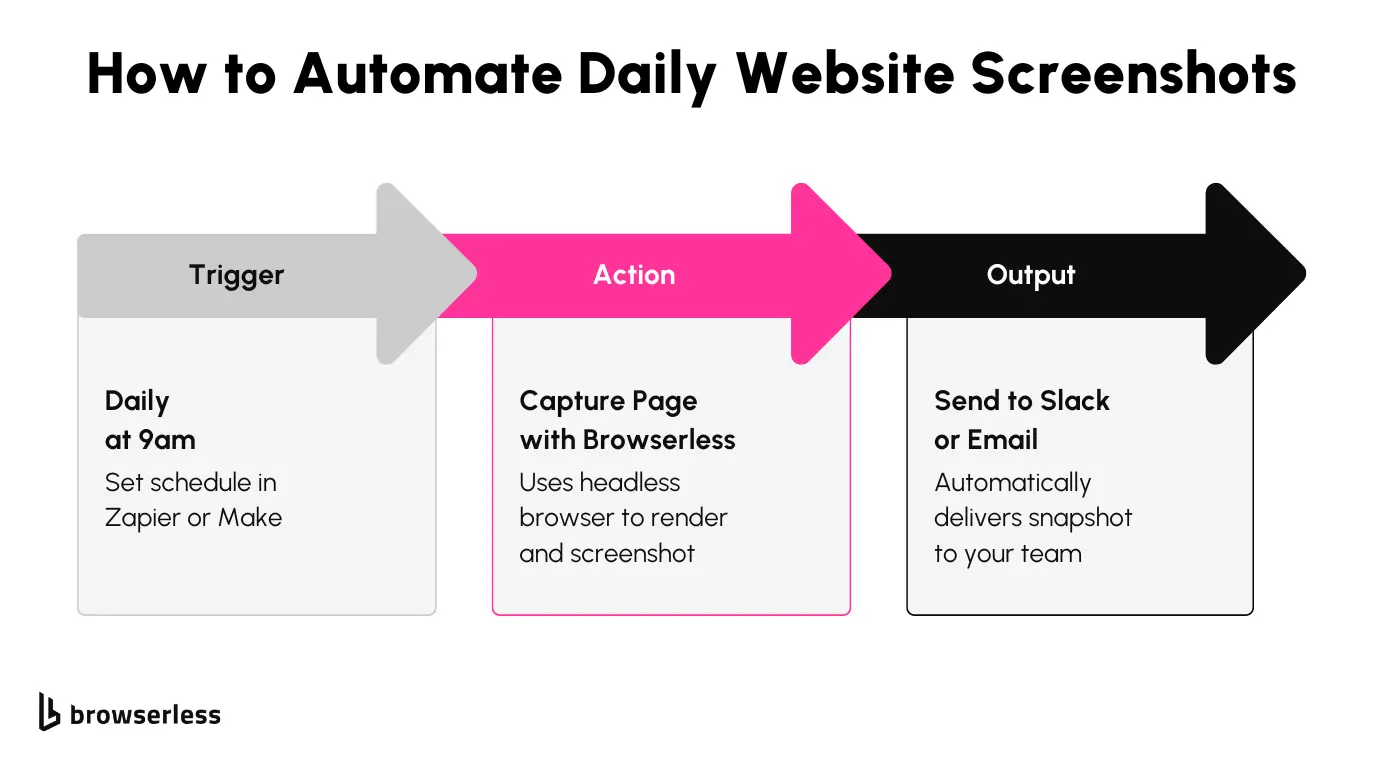
With Browserless and Zapier, you can set up a simple automation that opens the page each morning, takes a full-page screenshot, and sends it to Drive or Slack. Here’s what that flow looks like:
And here’s the kind of screenshot it captures:
It’s useful for checking:
- If listings are actually rendering (instead of timing out or erroring)
- Whether anything unexpected is showing up like used units dominating results
- How sponsored placements or badges shift over time
Since you’re capturing what a real browser sees, it’s like doing visual QA on the public web without writing tests or shipping code.
How the Zap Works
This kicks off the workflow on a fixed schedule. Daily at 9am, for example. Just a basic trigger to keep the checks running regularly.
This is the main action. You’re sending a POST request to the Browserless /screenshot endpoint with a payload that looks like this:
{
  "url": "https://www.ebay.com/sch/i.html?_nkw=nintendo+switch",
  "options": {
    "fullPage": true,
    "type": "png",
    "viewport": {
      "width": 1440,
      "height": 1000
    }
  }
}
And to make sure it loads as close to a real browser as possible, you add these launch flags:\
&headless=false&stealth=true&--window-size=1440,1000&--lang=en-US
This tells Browserless to render visibly, emulate a human browser, and use a US-English language setting all of which help when you're trying to replicate real user views or avoid bot blocks.
Since the screenshot gets returned as a base64 string, this step lets you transform or clean up the result. You can decode it, wrap it, or pass it on as-is to Drive, Slack, or wherever you're archiving the visuals.
It’s a clean, no-code way to get daily visibility into what your customers (or competitors) are actually seeing without scraping, scripts, or maintenance overhead.
Example #2: Scrape Product Availability with Make.com
While screenshots are great for visual monitoring, there are plenty of cases where you need structured data you can feed into systems especially when tracking prices and listings over time. Whether you're running a storefront, managing affiliate links, or just watching competitors, knowing how prices shift is critical. This next automation shows how to scrape that data, store it, and act on it without writing a scraper from scratch.
Let’s say you're keeping a close eye on the Nintendo Switch 2 listings on eBay. Prices fluctuate constantly depending on availability, location, and seller strategies. Maybe you're adjusting your pricing daily based on market averages or alerting your ops team if prices spike. Either way, you need structured data and a reliable way to get it, on schedule, in a format your stack understands.
That’s where Make.com and Browserless BQL can work wonders.
What the Flow Looks Like
Below is a real working Make scenario that checks eBay listings hourly and syncs them to a Google Sheet:
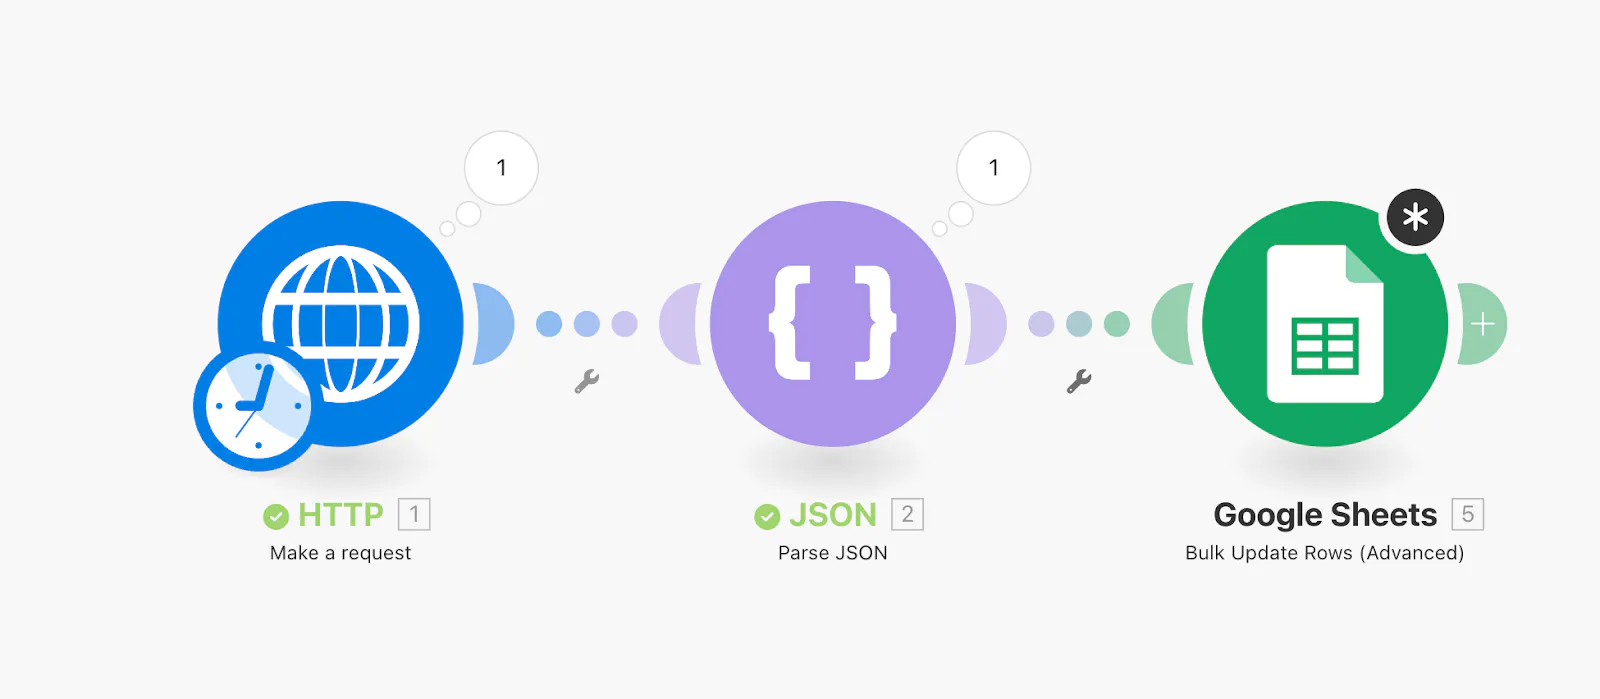
It’s a simple but powerful 3-step process:
- HTTP Module: Sends a GraphQL mutation to Browserless to run a headless Chrome session and extract listing data.
- JSON Module: Parses the structured results from BQL into usable fields.
- Google Sheets Module: Stores the results for analysis, alerting, or reporting.
Once configured, this automation can run every hour, giving your team live pricing data with zero manual effort.
How It Works
In the HTTP Request module, you're sending a POST to Browserless’s /bql endpoint with a custom mutation. This script tells Browserless to:
- Open the eBay search page for “Nintendo Switch 2”
- Wait for the full page to load (network idle)
- Select key listing elements using CSS selectors
- Return structured results: title, price, shipping, seller, and more
Here’s what the body of that request looks like:
mutation ScrapeNintendoWithMapping { goto( url: "https://www.ebay.com/sch/i.html?_nkw=nintendo+switch+2", waitUntil: networkIdle ) { status time } results: mapSelector(selector: "li.s-item") { title: mapSelector(selector: ".s-item__title") { innerText } price: mapSelector(selector: ".s-item__price") { innerText } shipping: mapSelector(selector: ".s-item__shipping") { innerText } seller: mapSelector(selector: ".s-item__seller-info") { innerText } location: mapSelector(selector: ".s-item__itemLocation") { innerText } sold: mapSelector(selector: ".s-item__quantitySold") { innerText } }}
Browserless returns clean JSON with the data you care about: no HTML parsing, no brittle XPath logic. The JSON module parses that into Make’s internal format, and the final Google Sheets step appends each result into a row.
This setup is deceptively simple but unlocks serious leverage. With pricing data flowing into a sheet on an hourly schedule, you can:
- Build price dashboards or Google Data Studio reports
- Feed alerts to Slack when pricing drops below target
- Compare SKU coverage across sellers
- Track historical price movement over days or weeks
It’s also easy to extend, want to monitor PS5 listings too? Duplicate the scenario, change the search URL, and you’re done. Need to run this every 5 minutes? Just adjust the schedule.
And because Browserless runs full Chrome sessions with real JS execution, you’re scraping the actual rendered DOM, not the static HTML. That means it works even when eBay changes layout or loads listings via JavaScript.
Low-Code vs Full-Code Scraping
Low-code scraping platforms, such as Zapier and Make, enable you to build and deploy browser-based automation without writing extensive JavaScript or Python code. You define triggers and actions visually, plug in Browserless endpoints, and handle everything through configuration. This is especially useful when you're dealing with repeatable tasks or when you want to hand off automation to someone without a development background.
Full-code scraping, on the other hand, gives you complete control over logic, error handling, retry behavior, and dynamic interactions. You can write custom scripts, handle complex pagination, use regular expressions, and integrate with databases or custom APIs. While it's more flexible, it also requires setup, deployment, and maintenance effort.
Where low-code stands out is the speed of iteration. You can go from idea to working automation in minutes. It’s also easier to manage when the logic is relatively simple, checking stock text, taking a screenshot, or sending alerts. Browserless plays well in both environments, exposing the same APIs regardless of whether you hit them from a webhook module or a hand-coded script.
One of the overlooked strengths of this model is reusability. Once you've built a scenario in Make or a Zap in Zapier, you can clone it, modify inputs, or share it with teammates. It reduces overhead when scaling to new sites or use cases. The JSON payloads don’t change, and the BQL logic remains consistent across environments.
On the privacy side, every browser session created by Browserless is isolated and ephemeral. That means no cookies, cache, or localStorage persist between runs, which reduces leakage of session data and helps avoid long-term fingerprinting. This setup works well whether you’re monitoring internal tools, public pages, or third-party resources, without leaving a session trail behind.
Conclusion
You now have a working model for combining Browserless with no-code tools to automate browser tasks. Whether it’s visual monitoring or content extraction, Zapier and Make give you the flexibility to schedule, format, and route the results however you want. Browserless handles browser execution in the cloud, allowing you to skip infrastructure and focus on the logic. If you’re ready to scale this or adapt it for your workflows, start experimenting with Browserless and see how far you can push browser automation without touching a server.
FAQs
What is Browserless used for in automation workflows?
Browserless provides an API to control headless Chrome in the cloud. It’s used for tasks like screenshots, web scraping, form submission, and content extraction, and works well with no-code platforms like Zapier and Make.
Can I use Zapier to scrape websites?
Zapier can trigger scraping workflows by using its webhook module to send requests to services like Browserless, which handles the actual browser-based execution in the cloud.
How do I check if a product is in stock using Make.com?
You can use the HTTP module in Make to send a BQL GraphQL mutation to Browserless. This checks for specific text like “In Stock” on the page and triggers a follow-up step (like a Slack alert) if the condition is met.
Is browser automation safe for private or sensitive tasks?
Yes. Browserless sessions are isolated and ephemeral. They don’t reuse cookies, storage, or sessions, which makes them safer for scraping internal tools or login-protected dashboards.
What’s the benefit of low-code scraping with Zapier or Make?
Low-code scraping allows faster prototyping and deployment without full-stack coding. It’s accessible for non-developers and still powerful enough to handle real-time browser interactions using APIs like Browserless.