TL;DR
- A browser automation API is a hosted service that lets you control a real Chrome browser over HTTPS or WebSocket, without running it inside your own platform runtime.
- Don't run Chrome inside your platform runtime if you need your app to log into a third-party site, fill forms, take a screenshot, generate a PDF, or do reliable data extraction on JavaScript-heavy pages.
- Use a browser automation API instead. For simple tasks, send HTTPS requests to a REST endpoint; for full control, connect via WebSocket using Puppeteer or Playwright.
- Persistent browser sessions let you maintain login state across requests, so you're not doing a new browser session and logging in on every request.
Introduction
AI coding platforms can ship a UI fast. However, the last mile can still break, when your app needs to interact with real websites that have login flows, bot detection, brittle front-ends, and dynamic pages that only render after JavaScript runs. That's where a browser automation API stops being a nice-to-have and becomes necessary infrastructure.
In this guide, you'll learn how to add browser automation to an AI-built app using a browser automation API, when to use a REST API vs. a WebSocket connection, how to keep a browser session alive, how to plug in existing scripts, and what to do when CAPTCHAs or Cloudflare show up.
What browser automation can do for your AI-built app
Browser automation matters because websites are the API. Sometimes there's a public API, sometimes there's a private one, and sometimes the only practical path is to drive the web page the way a user would and pull the data you need.
Here are workflows that justify browser automation instead of a scraping-only approach:
- Login automation on behalf of users - Authenticate into portals, SaaS dashboards, internal tools, or partner sites and keep a session alive.
- Form filling and submissions - Onboarding flows, lead gen, booking systems, job applications, and multi-page wizards.
- Authenticated monitoring - Prices, inventory, account balances, and usage dashboards behind login.
- Screenshots and PDFs - Receipts, invoices, confirmations, printing to PDF, visual regression checks, and audit trails.
- JavaScript-heavy pages - SPAs where the HTML is empty until hydration, infinite scroll, client-side rendering, and fetch/XHR-driven content.
Many AI agent demos stop at natural language planning. The hard part is the browser-use layer and actually executing tasks reliably across real websites with timeouts, retries, and a consistent browser state.
How browser automation APIs work
Your app sends a request, a managed browser runs the workflow, and you get back data, a screenshot, a PDF, or a stream of events.
A simple architecture looks like this:
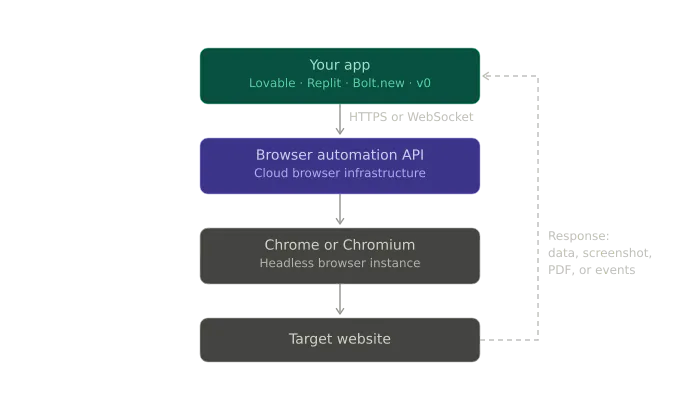
There are three common interfaces:
1. REST API for one-shot tasks
REST API calls work well when you can express the task as a single request:
- Screenshot a webpage
- Generate a pdf
- Fetch rendered HTML
- Run a script and return JSON
You typically POST JSON to an endpoint like /screenshot or /pdf over HTTPS, and the service returns bytes or JSON - it's the quickest path for AI-built apps that can already call an API.
Here's an example request shape:
POST /screenshot HTTP/1.1
Host: chrome.your-provider.com
Authorization: Bearer YOUR_TOKEN
Content-Type: application/json

{
  "url": "https://example.com",
  "options": {
    "fullPage": true
  }
}
2. A WebSocket connection for full control
If you need to click around, handle redirects, wait for selectors, keep state, or reuse existing scripts, you connect to a remote browser over WebSocket and use Puppeteer or Playwright, as you would locally.
The key ergonomic win is that you keep your existing scripts. The diff is usually one line: swap launch() for connect().
// Before: local Chrome (often fails in serverless / locked-down runtimes)
const browser = await puppeteer.launch();

// After: managed browser (works anywhere you can open a WebSocket)
const browser = await puppeteer.connect({
  browserWSEndpoint: "wss://production-sfo.browserless.io?token=YOUR_TOKEN",
});
Now you have full control of new pages, navigation, typing, file downloads, and request interception, and the ability to hold a browser session open while you perform tasks.
3. Declarative automation for complex flows
Some platforms expose a higher-level API, handling waits, retries, and page timing while you describe intent. As this automation narrows the surface area for flakiness, it's often positioned as automation for AI agents.
Even if you stick with Puppeteer, it helps to think in this declarative direction. You want fewer brittle sleeps and more conditions like:
- Wait for a selector
- Wait for network idle
- Assert URL
- Extract structured data.
Now that the interfaces are clear, how do you add this automation to an app you shipped from an AI coding platform… without turning it into a flaky mess?
Adding a browser automation API to your app: A step-by-step guide
Pick the simplest option that still meets your requirements, while keeping the interfaces in mind. You don't want unnecessary complexity if all you need is a screenshot, but you also don't want to force REST into a flow that needs a real session and interactive navigation.
Step 1: Pick the simplest interface that works
Here's a table to help you make a decision:
| Use case | Best approach | Why |
|---|---|---|
| Screenshot a web page | REST API | One request, predictable output |
| Generate a PDF or print view | REST API | Same flow as screenshot, different renderer settings |
| Public data extraction | REST API or WebSocket | REST for single-page render, WS for multi-step |
| Login and navigation | WebSocket (Puppeteer/Playwright) | You need state, clicks, and waits |
| Multi-step workflows with lots of branching | WebSocket or declarative API | You need retries, assertions, and better control |
When in doubt, start with REST. If you hit limits around browser sessions, timing, or site interactions, move to WebSocket.
Step 2: Wire auth and environment variables
Treat your browser automation API key like any other secret. In Replit, you'll typically use Secrets; in Vercel, you'll use environment variables; in Bolt.new, you'll usually proxy through a backend route.
However, the basic pattern stays the same:
BROWSER_AUTOMATION_API_TOKENin env- Server-side route calls the API
- The client never sees the token
Step 3: Implement the easiest automation first, e.g., a screenshot
Here's a Node example using the REST API:
export async function screenshotUrl(url) {
  const TOKEN = process.env.BROWSER_AUTOMATION_API_TOKEN;
  const res = await fetch(
    `https://production-sfo.browserless.io/screenshot?token=${TOKEN}`,
    {
      method: "POST",
      headers: {
        "Content-Type": "application/json",
      },
      body: JSON.stringify({
        url,
        options: { fullPage: true },
      }),
    },
  );

  if (!res.ok) {
    const text = await res.text();
    throw new Error(`Screenshot failed: ${res.status} ${text}`);
  }

  return Buffer.from(await res.arrayBuffer());
}
Python example (useful if your "AI platform" backend is Python):
import os
import requests

def screenshot_url(url: str) -> bytes:
    TOKEN = os.environ["BROWSER_AUTOMATION_API_TOKEN"]
    resp = requests.post(
        f"https://production-sfo.browserless.io/screenshot?token={TOKEN}",
        json={"url": url, "options": {"fullPage": True}},
        timeout=60,
    )
    resp.raise_for_status()
    return resp.content
This code provides you with a working integration and a reliable baseline for retries, request logging, and latency.
Step 4: Move to login and data extraction with WebSocket
REST can get challenging fast when you first need an authenticated session. You want a browser you can connect to, open pages, and run steps.
Here's an example with Puppeteer:
import puppeteer from "puppeteer-core";

export async function loginAndExtract({ email, password }) {
  const browser = await puppeteer.connect({
    browserWSEndpoint: `wss://production-sfo.browserless.io?token=${process.env.BROWSER_AUTOMATION_API_TOKEN}`,
  });

  const page = await browser.newPage();
  page.setDefaultTimeout(45_000);

  await page.goto("https://app.example.com/login", { waitUntil: "networkidle2" });
  await page.type("#email", email);
  await page.type("#password", password);
  await page.click('button[type="submit"]');
  await page.waitForNavigation({ waitUntil: "networkidle2" });

  const data = await page.evaluate(() => {
    const el = document.querySelector(".dashboard-data");
    return el ? el.textContent.trim() : null;
  });

  await browser.close();
  return data;
}
It's at this stage that existing scripts shine. If you already have Puppeteer flows that run locally, the migration is mostly about connection and environment constraints.
Step 5: Persist browser sessions so you don't re-login constantly
A lot of production pain is self-inflicted. You create a new browser session for every request, log in every time, and then wonder why accounts get locked and performance falls off.
The fix is session persistence with stored cookies and local storage so you can reconnect later with the same browser state.
- Create a persistent session
- Connect with
sessionId - Reuse across requests for that user
Here's an example:
const TOKEN = process.env.BROWSER_AUTOMATION_API_TOKEN;
// 1) create a persistent session (provider-specific endpoint)
const sessionRes = await fetch(
  `https://production-sfo.browserless.io/session?token=${TOKEN}`,
  {
    method: "POST",
    headers: { "Content-Type": "application/json" },
    body: JSON.stringify({ ttl: 60000 }),
  },
);
const { connect } = await sessionRes.json();

// 2) connect using that session in later runs
const browser = await puppeteer.connect({
  browserWSEndpoint: connect,
});
Practically, this means:
- You keep localStorage tokens or session cookies across runs
- You can resume work without a fresh login
- You reduce bot detection triggers caused by repeated auth flows
If you're building agent-style automation, session persistence is what makes browser interactions feel stateful rather than a series of stateless requests.
Now that you can automate reliably in the abstract, the next thing you'll hit is platform reality: where does this code actually run in Lovable, Replit, Bolt.new, or v0?
Platform notes for Lovable, Replit, Bolt.new, and v0
You've already seen the core patterns. The differences across AI platforms are mostly about networking, time limits, and where you're allowed to run the code. With that in mind, here's how the same browser automation API integration tends to land in each environment.
Lovable: Treat automation as an API call
Lovable apps usually perform best with the cleanest possible integration:
- Use REST API calls for screenshots, PDFs, and simple data extraction
- For full control workflows, route through a backend function that can open WebSocket connections
- Store per-user
sessionIdin your database so you can reconnect
The key is to keep the token server-side and make your frontend call your own endpoint, not the automation provider directly.
Replit: Full Node/Python backend, i.e., the easiest place for WebSocket
Replit is typically the least restrictive:
- Puppeteer, Playwright, and Selenium are all feasible if you're connecting to a remote browser
- You can use proxy settings, queue jobs, and run long tasks
- Environment variables are straightforward
If you already have scripts, this is where you can drop them in with minimal changes.
Bolt.new: Serverless constraints show up fast
Bolt.new deployments push you toward:
- REST API for most workflows
- WebSocket only if your runtime allows long-lived connections
- Tight timeouts and careful retries
If a flow needs 2-3 minutes because of a slow site or a CAPTCHA, design for async: enqueue a job, return a status, and poll for completion.
v0 and Vercel: Optimize for short requests and job queues
On Vercel, you're typically dealing with:
- Function execution time limits
- Cold starts
- Streaming responses if you need progressive results
The pattern that scales is:
- API route kicks off a job
- The queue worker runs the browser automation
- UI polls for results or receives a webhook
Cost and scale become considerations at this point, as you manage concurrent browser sessions, retry storms, and rate limits.
Once you've got it running in your platform, you'll run into the real blockers, such as detection, CAPTCHAs, dynamic content, and flaky waits.
Common challenges and keeping automation reliable
Browser automation failures usually aren't mysterious - they're patterns often caused by anti-bot checks, missing waits, state loss, rate limits, or inconsistent client fingerprints.
Challenge 1: Bot detection and headless fingerprints
Sites don't just look for navigator.webdriver anymore. They correlate signals like:
- TLS and HTTP fingerprints
- Inconsistent user agents and client hints
- Weird viewport defaults
- Missing fonts, missing GPU features
- Suspicious behavior timing
You're not invisible, just less obvious when you cause these signals.
Practical fixes that help without getting over-complicated:
- Set a realistic User-Agent and viewport
- Avoid the default headless markers where your stack supports it
- Use consistent headers across runs
- Prefer real navigation and waits over instant DOM grabs
Here's a Puppeteer snippet you can use:
await page.setUserAgent(
  "Mozilla/5.0 (Macintosh; Intel Mac OS X 10_15_7) AppleWebKit/537.36 (KHTML, like Gecko) Chrome/122.0.0.0 Safari/537.36",
);
await page.setViewport({ width: 1365, height: 768 });
Challenge 2: CAPTCHAs
CAPTCHAs are a product decision by the target site. Sometimes you can reduce how often you trigger them, but you won't eliminate them.
Your options include:
- Avoid triggering them - Fewer logins, slower rate, session reuse, and consistent browser state.
- Solve them - Use a provider with CAPTCHA support, or plug in a third-party solver.
- Human-in-the-loop - Pause and ask the user to complete a challenge in an interactive step.
If your app is user-facing and you're automating their own accounts, the human-in-the-loop fallback is often the most defensible approach.
Challenge 3: Dynamic content is not loaded when you extract
The classic bug: page.content() returns an empty shell because the app is a SPA and the data loads after XHR calls.
Here are the most common fixes:
- Wait for selectors that represent ready state
- Wait for network idle where appropriate
- Wait for a specific API response you care about
Some example code:
await page.goto("https://example.com/dashboard", { waitUntil: "domcontentloaded" });
await page.waitForSelector('[data-test="dashboard-ready"]', { timeout: 45_000 });

const rows = await page.$$eval("table tbody tr", (trs) =>
  trs.map((tr) => tr.innerText),
);
Challenge 4: Rate limits and scaling browser sessions
Scaling browser automation is not like scaling stateless HTTP.
You need to manage:
- Concurrency caps - how many sessions at once
- Retries with backoff
- Idempotency, so you don't double-submit forms
- Per-site pacing so you don't burn accounts or IPs
A simple pattern that holds up is to enqueue tasks, limit concurrency per domain, store per-user session IDs, and log every navigation and response status.
Once you've handled the failure modes, you can make a rational choice about tooling - open source automation libraries, a hosted platform, or something self-hosted.
Choosing the right browser automation API
This is where teams waste time: they buy a scraping API for an interactive workflow, then spend weeks building the missing pieces. If you need interactivity, start from a browser-first tool and treat scraping as one output mode.
Here's a practical comparison matrix of some of the browser automation options:
| Factor | Browserless | Firecrawl | Browserbase |
|---|---|---|---|
| Simple data extraction | ✓ | ✓ | ✓ |
| Interactive workflows | ✓ | ✓ | ✓ |
| Login and session persistence | ✓ | ✓ | ✓ |
| WebSocket Puppeteer/Playwright | ✓ | ✓ | ✓ |
| Stealth and anti-detection | ✓ | Limited | Limited |
| Human-in-the-loop (Live URL) | ✓ | ✗ | ✓ |
| Self-hosted option | ✓ | ✓ | ✗ |
| Best when you want | Full control and persistent sessions | AI-prompt-driven scraping | Agent-like flows |
If the libraries you already know are open source - Puppeteer, Playwright, and Selenium - and under the hood they speak browser protocols - Chrome DevTools Protocol for Chrome-family browsers - open source may well be the right fit.
Here's a good rule to follow when making your decision:
- If your automation is one request and done, use REST.
- If your automation needs state, use WebSocket.
- If your automation needs to survive the real web, pick a platform that's optimized for detection edge cases and operational scale.
Real-world project ideas you can ship
Once you have a browser automation API wired in, the projects that felt blurry become clear and straightforward.
Here are some ideas for AI plus browser automation solutions.
1. A price monitoring dashboard
- Use browser sessions to stay authenticated
- Navigate to product pages
- Extract prices and availability
- Store history and chart it
2. A job application tracker
- Drive multi-page forms
- Upload files where allowed
- Take a screenshot of confirmation screens for auditability
3. A social media scheduler
- Log in once and reuse browser state
- Post content, then pull analytics pages
- Save screenshots as proof of publishing
4. An invoice collector and PDF pipeline
- Log in to vendor portals
- Download invoices or print to PDF
- Extract totals and due dates into structured data
Each of these benefits from a mix of REST API endpoints and WebSocket flows for interactive navigation.
To keep your build from drifting, the final piece is an implementation checklist you can follow every time you add a new site.
Getting started with production-grade automation
You can get a demo working in an hour, but the difference between demo and production is whether you can keep it running next month.
Use this checklist to keep your app running:
- Store your API token in env, never in client code
- Start with a simple REST API call to validate networking
- Move to WebSocket when you need full control
- Persist browser sessions to avoid repeated logins
- Capture artifacts, including screenshot on failure, HTML snapshot, and final URL
- Use explicit waits, not
setTimeout - Add retries with backoff, and make actions idempotent
- Rate limit by domain and by user
- Decide your CAPTCHA strategy up front
- Log request IDs and timing so you can debug flakiness
If you follow these steps, you can build automation that's boring - and boring is what you want in infrastructure.
Conclusion
AI tools can generate your UI and your API routes, but they can't guarantee that a third-party website will behave like an API. A browser automation API is the missing action layer: it lets your app connect to a real browser, keep a session, interact with websites, and return screenshots, PDFs, or extracted data in a way you can ship and scale.
If you already have existing scripts in Puppeteer, Playwright, or Selenium, start by swapping launch() for connect(), then add session persistence and error capture. You'll get reliable automation without running Chrome yourself, and the path to self-hosted deployments later is kept open if your infrastructure demands it.
FAQs
What's the difference between a scraping API and browser automation?
Scraping APIs usually fetch and parse HTML. Browser automation controls a real browser - it can click, type, execute JavaScript, maintain browser state, and handle authenticated flows.
Can you use Puppeteer in Replit or Lovable?
Yes, if you connect to a remote browser over WebSocket. The platform doesn't need to run Chrome locally; it just needs network access to connect.
How do you keep users logged in between requests?
Use browser sessions that persist cookies and local storage. Store the session ID per user, then reconnect with that session for future tasks instead of creating a new browser session.
What do you do when a site uses Cloudflare or CAPTCHAs?
You reduce triggers by reusing sessions, pacing requests, and keeping a consistent fingerprint. When challenges continue to appear, you either solve them with a provider integration or fall back to a human-in-the-loop flow.