Azure Functions App and Puppeteer offer a great combination for browser automation. Functions offer a serverless environment and lets you scale these tasks without worrying about the infrastructure.
If you're interested in learning how to do this, we'll show you how to deploy Puppeteer on Azure Functions App’s consumption plan. That includes how to get around Puppeteer going past the Function's file size limitation.
You'll get instructions to either connect to an existing browser pool, or how to host one yourself.
How to use AzureFunction Apps to deploy Puppeteer
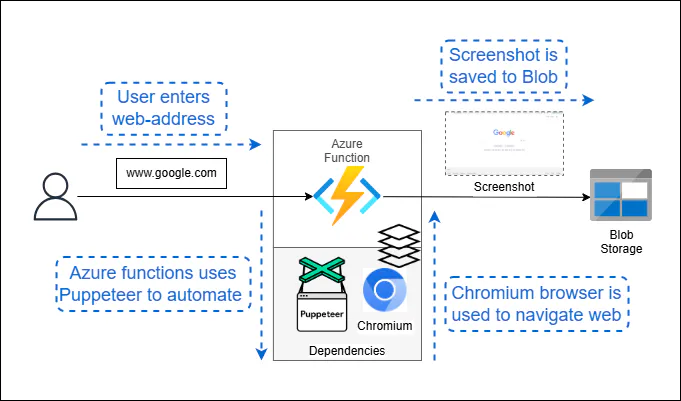
We'll create an Azure function with a consumption plan that uses a website’s URL as its input. As an example use case, we'll include instructions for taking a screenshot with Puppeteer.
Using puppeteer-core and a separate Chrome browser, the function will visit the provided website, capture a screenshot, and save it to a blob storage. This process helps us check if the function works.
A quick note about hosting browsers
Running on a Function comes with limitations. The most important is file size limits, as Chrome by default is too big to fit in a function.
It’s why this guide is going to use puppeteer-core with a separate compressed browser, instead of the default Puppeteer package that’s bundled with the standard image.
Plus, if you’re going to perform large-scale parallel testing or automation, it becomes hard to continue using Azure Function due to these constraints such as usage restrictions and execution speed limits.
The DIY Option: Running Puppeteer & Chrome on Azure Functions
Step 1: Install dependencies
You need to install puppeteer-core within the Azure Functions app as a dependency. Do this by navigating to Azure’s function director and using the command line below:
cd /path/to/your/azure-function-project
npm init -y
npm install puppeteer-core @azure/storage-blob
This command lets you install Puppeteer Core, Puppeteer's version that doesn't automatically download Chromium. It also installs the Azure Storage Blob SDK, a required dependency for the Azure function.
Step 2: Create the package.json file
The package.json file lists the dependencies, and it's created when you install them.
The file should look like this with all the dependencies listed, but keep in mind that the version numbers can be different for your function:
{
  "name": "azure-function-project",
  "version": "1.0.0",
  "description": "",
  "main": "index.js",
  "scripts": {
    "test": "echo \"Error: no test specified\" && exit 1"
  },
  "keywords": [],
  "author": "",
  "license": "ISC",
  "dependencies": {
    "@azure/storage-blob": "^12.12.0",
    "puppeteer-core": "^13.7.0"
  }
}
Step 3: Download Chromium
We're using puppeteer-core, which does not include a version of the Chrome browser. So, we'll have to manually download Chrome and provide the path with the executablepath variable.
We’ll use the Sparticuz/Chromium file from Github, a compressed version of Chrome with the code needed to decompress the brotli package..
Download the file using the command below and use makefile in the repository to create binaries.
git clone --depth=1 https://github.com/Sparticuz/chromium.git
cd chromium
make Chromium
These files will create binaries that you can shift to the project folder. Make a note of the binaries' path so you can use it in the main code.
Step 4: Write the Azure Function
You can create the Azure function using Azure's console and Node.js runtime. Allocate at least 512 MB of RAM to run the function.
Azure Functions' default timeout of 5 minutes — sufficient for automating the task of taking a screenshot. You can increase it to 10 minutes if needed.
Below, you can find the index.js code:
const puppeteer = require("puppeteer-core");
const { BlobServiceClient } = require("@azure/storage-blob");

// Azure Storage connection string
const AZURE_STORAGE_CONNECTION_STRING = process.env.AZURE_STORAGE_CONNECTION_STRING;
const CONTAINER_NAME = "screenshots";

module.exports = async function (context, req) {
  // Placeholder for Azure Storage container name
  const containerName = CONTAINER_NAME;

  // Extract the URL from the request or default to 'https://www.example.com'
  const url = req.query.url || "https://www.google.com";

  // Parse the URL to extract the hostname
  const parsedUrl = new URL(url);
  const hostname = parsedUrl.hostname;

  try {
    // Launch a headless Chromium browser using Puppeteer
    const browser = await puppeteer.launch({
      executablePath: "/absolute/path/to/chromium", // Replace with the actual path to Chromium executable
      args: ["--no-sandbox", "--disable-setuid-sandbox"], // Chromium flags
      headless: true,
    });

    // Open a new page in the browser
    const page = await browser.newPage();

    // Navigate to the specified URL
    await page.goto(url);

    // Take a screenshot of the page
    const screenshotBuffer = await page.screenshot();

    // Close the browser
    await browser.close();

    // Create a BlobServiceClient object using the Azure Storage connection string
    const blobServiceClient = BlobServiceClient.fromConnectionString(
      AZURE_STORAGE_CONNECTION_STRING,
    );

    // Get a reference to a container
    const containerClient = blobServiceClient.getContainerClient(containerName);

    // Upload the screenshot to the Azure Blob Storage container
    const blobName = `${hostname}.png`;
    const blockBlobClient = containerClient.getBlockBlobClient(blobName);
    await blockBlobClient.upload(screenshotBuffer, screenshotBuffer.length);

    context.log("Screenshot uploaded to Azure Blob Storage");
    context.res = {
      status: 200,
      body: "Screenshot uploaded to Azure Blob Storage",
    };
  } catch (error) {
    // Handle and log errors
    context.log.error("Error:", error);
    context.res = {
      status: 500,
      body: "Error occurred while taking screenshot and uploading to Azure Blob Storage",
    };
  }
};
Step 5: Trigger and test the code
Tigger the code using the Azure console's test/run button. Use the website's name as the input.
Our code uses "google.com" as the default if you don't provide input. The function stores the website's screenshot in the blob storage if it runs successfully.
Avoid squeezing Chrome into a Function and let Browserless manage your browsers
Automating browser tasks in the cloud has too many moving parts. Puppeteer, Chromium and the cloud's serverless backend work independently — so they require constant monitoring and updates to ensure compatibility.
Instead of going through the hassle of doing this all the time, use our pool of hosted browsers.
We host thousands of browsers ready to use with Puppeteer — and don't come with these headaches.
Take it for a spin using our free account.