Deploying Puppeteer on GCP Compute Engines is a powerful solution for automating browsers at scale, but it can be tricky to set up and maintain. There's various issues you'll run into such as missing dependencies.
In this guide, we'll walk through setting up Puppeteer on a GCP Compute Engine, from choosing the right instance type to installing necessary dependencies and configuring your environment for optimal performance.
Choosing the Right Google Cloud Engine
When deploying Puppeteer on Google Cloud, selecting the appropriate GCE size is essential for optimal performance. A n1-standard-1 or e2-medium instance, equipped with 4-8 GB of RAM, typically provides enough resources for Puppeteer to run efficiently. For storage, allocating at least 10 GB is advisable to store Chromium and any temporary files created during execution.
We will use Ubuntu OS since it is supported by Puppeteer and available on Google Compute Engine.
Setting up Compute Engine and Puppeteer
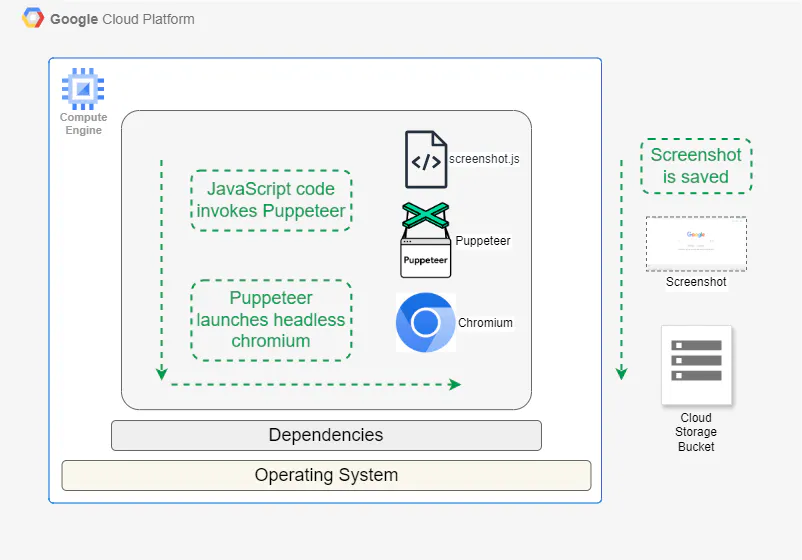
Launch your Google Compute Engine with Ubuntu, ensuring proper storage configurations, and connect via SSH. To install Node.js and Puppeteer, follow the commands provided below.
Additionally, we will install the Google Cloud Storage client library for JavaScript, which is needed to upload screenshots to a Google Cloud Storage bucket from GCE.
# Update your system
sudo apt-get update
sudo apt-get upgrade

# Install curl if not already installed
sudo apt-get install -y curl

# Install Node.js (v22.x): Download and run the setup script
curl -fsSL https://deb.nodesource.com/setup_22.x -o nodesource_setup.sh
sudo -E bash nodesource_setup.sh

# Install Node.js
sudo apt-get install -y nodejs

# Verify Node.js installation
node -v

# Install Puppeteer
npm install puppeteer

# Google Cloud storage library
sudo npm install @google-cloud/storage
Installing dependencies
Dependency management sometimes becomes complex, as package names, versions, and availability may change over time and with different OS versions.
The following dependency list is tested for Ubuntu on GCE and represents the current working set. However, remember that as Ubuntu and Puppeteer evolve, this list may need updating.
#!/bin/bash

# Update package lists
sudo apt update

# Install dependencies
sudo apt install -y \
    dconf-service \
    libasound2 \
    libatk1.0-0 \
    libatk-bridge2.0-0 \
    libc6 \
    libcairo2 \
    libcups2 \
    libdbus-1-3 \
    libexpat1 \
    libfontconfig1 \
    libgcc-s1 \
    libgdk-pixbuf2.0-0 \
    libglib2.0-0 \
    libgtk-3-0 \
    libnspr4 \
    libpango-1.0-0 \
    libpangocairo-1.0-0 \
    libstdc++6 \
    libx11-6 \
    libx11-xcb1 \
    libxcb1 \
    libxcomposite1 \
    libxcursor1 \
    libxdamage1 \
    libxext6 \
    libxfixes3 \
    libxi6 \
    libxrandr2 \
    libxrender1 \
    libxss1 \
    libxtst6 \
    ca-certificates \
    fonts-liberation \
    libayatana-appindicator3-1 \
    libnss3 \
    lsb-release \
    xdg-utils \
    wget \
    libgbm1 \
    libxshmfence1

# Clean up
sudo apt autoremove -y
sudo apt clean
Without the correct set of dependencies, Puppeteer fails with errors such as:
cannot open shared object file: No such file or directoryAn error occurred: Error: Failed to launch the browser process
Configuring Google Cloud Storage
The code in the following section stores the screenshot in Google Cloud Storage. You need to set up a cloud storage bucket and provide authentication to GCE to save screenshots. Compute Engine also needs the Google Cloud Storage library, which we've already installed in the previous section.
Set up the bucket in Google Cloud Storage to store screenshots and provide the permissions using the following steps:
- Enable Cloud Storage API - In Google Cloud Console, enable the Cloud Storage API through APIs & Services > Library.
- Adding permissions to GCE - The simplest way to handle authentication is to use the default service account.. Ensure this service account has the "Storage Object Creator" role for your bucket in IAM & Admin > IAM.
Granting the service account (assigned to the GCE) the necessary permissions—like Storage Object Creator or Storage Admin—on the bucket will allow the GCE to access and upload objects to Google Cloud Storage.
Writing the code
The following code takes the website URL as input, captures a screenshot and saves it to the Cloud Storage bucket.
const puppeteer = require("puppeteer");
const { Storage } = require("@google-cloud/storage");
const fs = require("fs");
const path = require("path");

// Get URL from command-line arguments
const url = process.argv[2];
if (!url) {
  console.error(
    "Please provide a URL as the first argument \n Ex - https://www.example.com",
  );
  process.exit(1);
}

// GCP Storage configuration
const bucketName = "your-bucket-name"; // Replace with your GCP bucket name

async function captureScreenshot(
  url,
  outputPath,
  viewportSize = { width: 1920, height: 1080 },
) {
  let browser;
  try {
    // Launch a headless browser with improved performance
    browser = await puppeteer.launch({
      headless: "new",
      args: ["--no-sandbox", "--disable-setuid-sandbox", "--disable-dev-shm-usage"],
      defaultViewport: viewportSize,
    });

    const page = await browser.newPage();

    // Set user agent to avoid detection as a bot
    await page.setUserAgent(
      "Mozilla/5.0 (Windows NT 10.0; Win64; x64) AppleWebKit/537.36 (KHTML, like Gecko) Chrome/91.0.4472.124 Safari/537.36",
    );

    // Navigate to the website with a timeout
    await page.goto(url, { waitUntil: "networkidle0", timeout: 60000 });

    // Wait for the body to ensure the page has loaded
    await page.waitForSelector("body");

    // Capture and save the screenshot to the local directory (/tmp for GCE)
    await page.screenshot({ path: outputPath, fullPage: true });
    console.log(`Screenshot saved to ${outputPath}`);

    // Initialize GCP Storage client (no keyFilename needed)
    const storage = new Storage();

    // Define the screenshot name (filename in GCP bucket)
    const fileName = `screenshots/${url.replace(/https?:\/\//, "").replace(/\//g, "_")}.png`;

    // Upload the screenshot to Google Cloud Storage
    await storage.bucket(bucketName).upload(outputPath, {
      destination: fileName,
      metadata: {
        contentType: "image/png",
      },
    });

    console.log(`Screenshot uploaded to GCP bucket at ${fileName}`);
  } catch (error) {
    console.error("An error occurred:", error);
  } finally {
    // Ensure the browser is closed even if an error occurs
    if (browser) {
      await browser.close();
    }
  }
}

// Usage: Pass URL and output file path via command line
(async () => {
  const outputPath = "/tmp/screenshot.png"; // Temp location to save the screenshot before uploading
  await captureScreenshot(url, outputPath);
})();
Now you're ready to run a Puppeteer script to capture screenshots. Use the following command to run the code (note the input format with https) -
node screenshot.js https://www.example.com
Managing deployments
Managing the dependencies and maintaining them continuously is a time consuming task.
Dependency installation can be hindered by resource contention issues, such as apt cache locks. These occur when multiple package management processes attempt to access shared resources simultaneously, potentially leading to deadlock-like situations.
Troubleshooting typically involves terminating conflicting processes, cleaning up incomplete package installations, and releasing system-wide locks. Proper resolution requires careful handling to maintain system integrity while resolving conflicts.
That’s before you get into issues such as chasing memory leaks and clearing out zombie processes. Without those steps, Puppeteer can gradually require more and more resources.
Simplify your Puppeteer deployments with Browserless
To take the hassle out of scaling your scraping, screenshotting or other automations, try Browserless.
It takes a quick connection change to use our thousands of concurrent Chrome browsers. Try it today with a free trial.