Introduction
Nodejs scrapers are very common in the scraping world since JavaScript and Node.js are widely used for web scraping, but handling CAPTCHAs, dynamic content, and bot detection can make traditional methods like Axios, Cheerio, and Puppeteer difficult to scale.
BrowserQL (aka BQL) simplifies this by automating JavaScript execution, CAPTCHA solving, and session management. In this guide, you’ll learn how to scrape efficiently with JavaScript, compare traditional approaches to BQL, and explore best practices for handling dynamic pages, rate limits, and large-scale scraping workflows.
How to do web scraping using javascript
To scrape websites using JavaScript (with Node.js), you typically follow one of two main approaches:
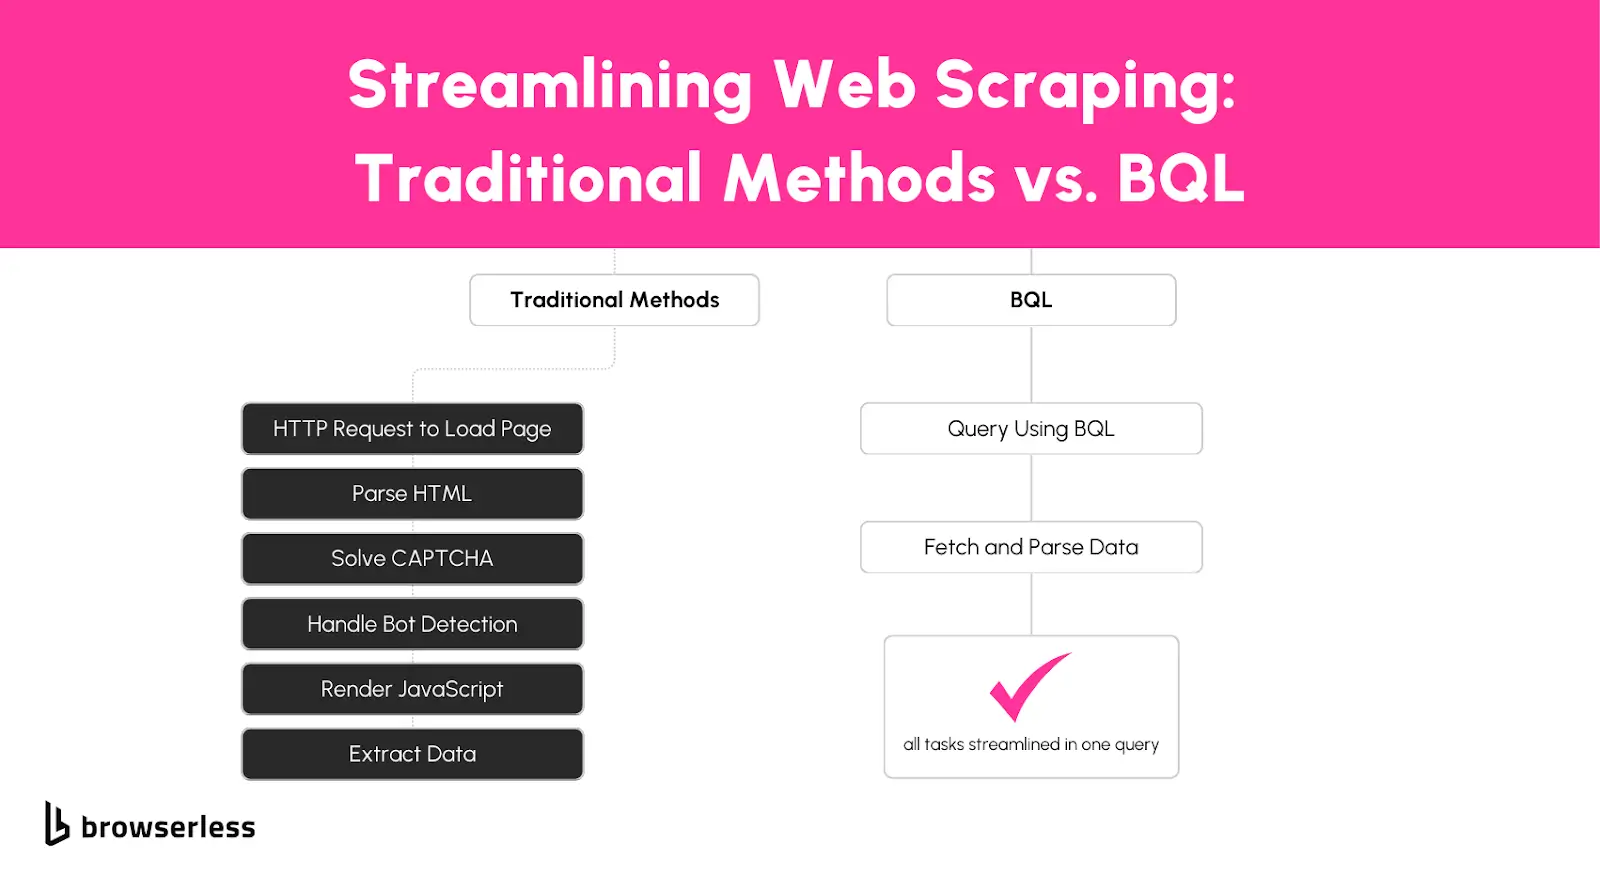
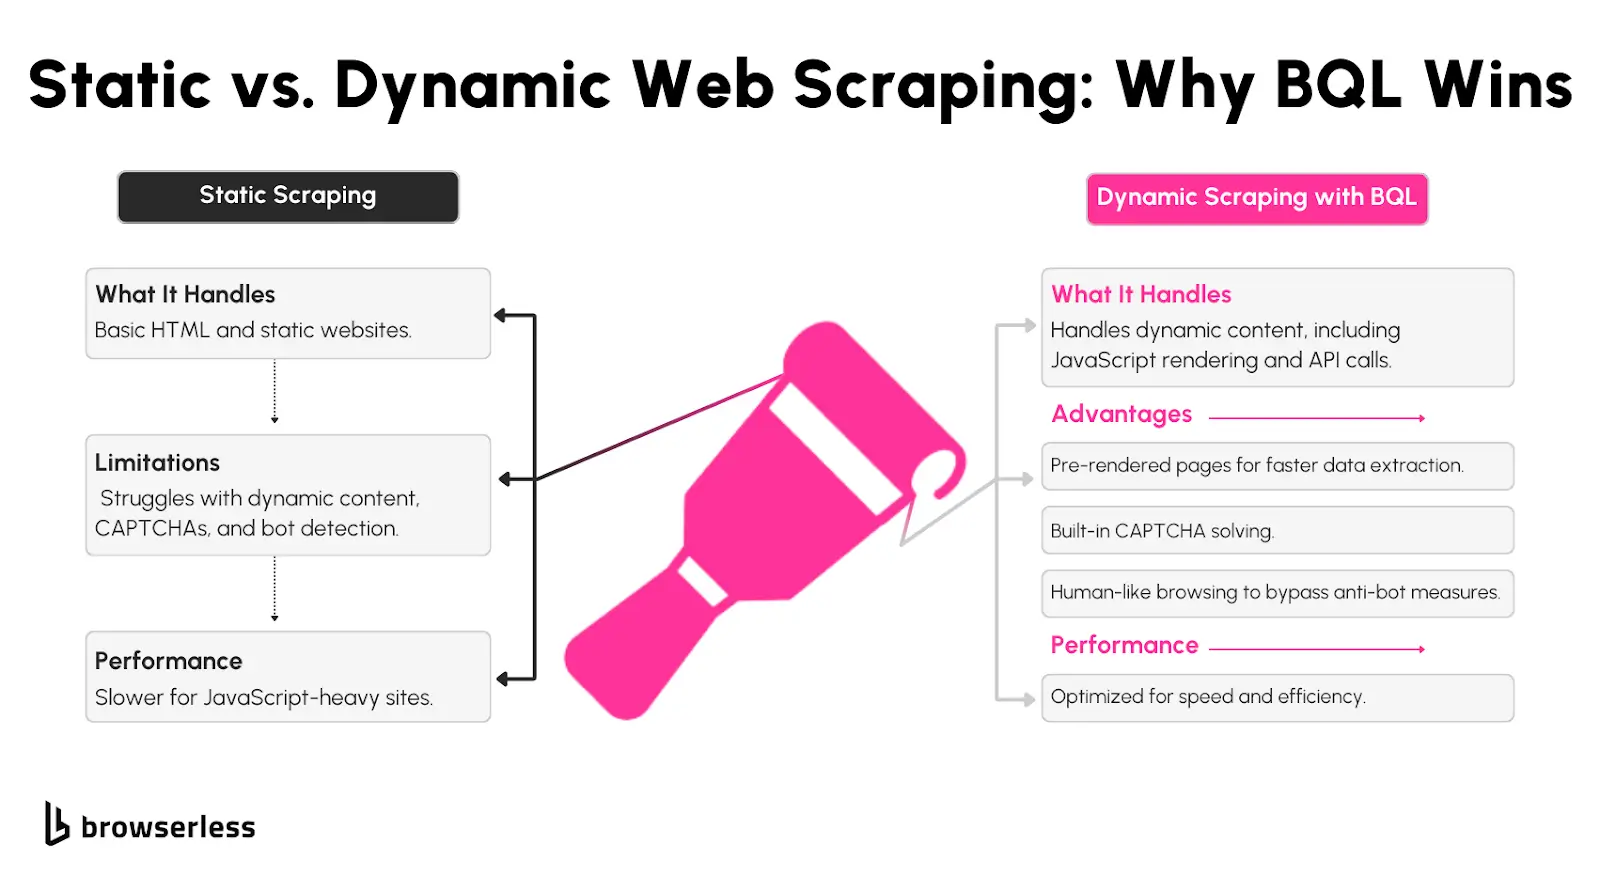
- HTTP request + DOM parsing - Use libraries like axios or node-fetch to fetch the raw HTML of a page, then parse it with a tool such as cheerio to extract specific elements (e.g. titles, links, prices). This works well for simple static HTML sites but fails when the site uses client-side rendering or dynamic JavaScript.
- Headless browser automation - Use a headless browser like Puppeteer to load the page as a real browser would (executing JS, handling AJAX calls, etc.), wait for the content to render, then grab the DOM or specific items from it. This approach handles dynamic content, single-page applications, and sites that rely heavily on JS - but it’s heavier on resources.
If you use our BrowserQL tool, you get the best of both worlds: BQL handles browser automation, JavaScript execution, session persistence, anti-bot/CAPTCHA bypassing and returns structured data - so you don't have to manage headless browsers or complex scraping infrastructure yourself.
Javascript Web Scraping Fundamentals
Understanding the Basics
Web scraping with JavaScript and Node.js is built around a few core techniques. The most common methods include making direct HTTP requests, parsing the Document Object Model (DOM), and automating a browser to interact with web pages.
The simplest way to scrape a website is by sending an HTTP request to fetch the raw HTML. Libraries like axios or node-fetch make this easy:
import axios from "axios";

async function fetchPage() {
  try {
    const response = await axios.get("https://example.com");
    console.log(response.data); // HTML content of the page
  } catch (error) {
    console.error("Error fetching page:", error);
  }
}

fetchPage();
This type of method works well for static websites but won’t handle JavaScript-rendered content or more dynamic websites.
Now, once you have your HTML fetched, it's time to parse the HTML into useful data you can do this with tools like cheerio which allow you to extract specific elements:
import axios from "axios";
import * as cheerio from "cheerio";

async function scrapeTitle() {
  const response = await axios.get("https://example.com");
  const $ = cheerio.load(response.data);

  const title = $("title").text();
  console.log("Page Title:", title);
}

scrapeTitle();
This is useful when working with structured HTML, but it won’t work for sites that generate content dynamically with JavaScript.
When JavaScript is required to render content, tools like Puppeteer help by launching a browser and interacting with the page:
import puppeteer from "puppeteer";

async function scrapeWithBrowser() {
  const browser = await puppeteer.launch();
  const page = await browser.newPage();
  await page.goto("https://example.com", { waitUntil: "networkidle2" });

  const content = await page.evaluate(() => document.body.innerHTML);
  console.log(content);

  await browser.close();
}

scrapeWithBrowser();
Here, the method handles JavaScript-heavy pages but comes with performance trade-offs, requiring more system resources and longer execution times.
Challenges in Traditional Approaches
Scraping isn’t as simple as loading a page and extracting data. Many modern sites rely on JavaScript to load content dynamically, making retrieving data with basic HTTP requests difficult.
If a page fetches data from an API after loading, a traditional scraper might only see an empty template instead of the full content.
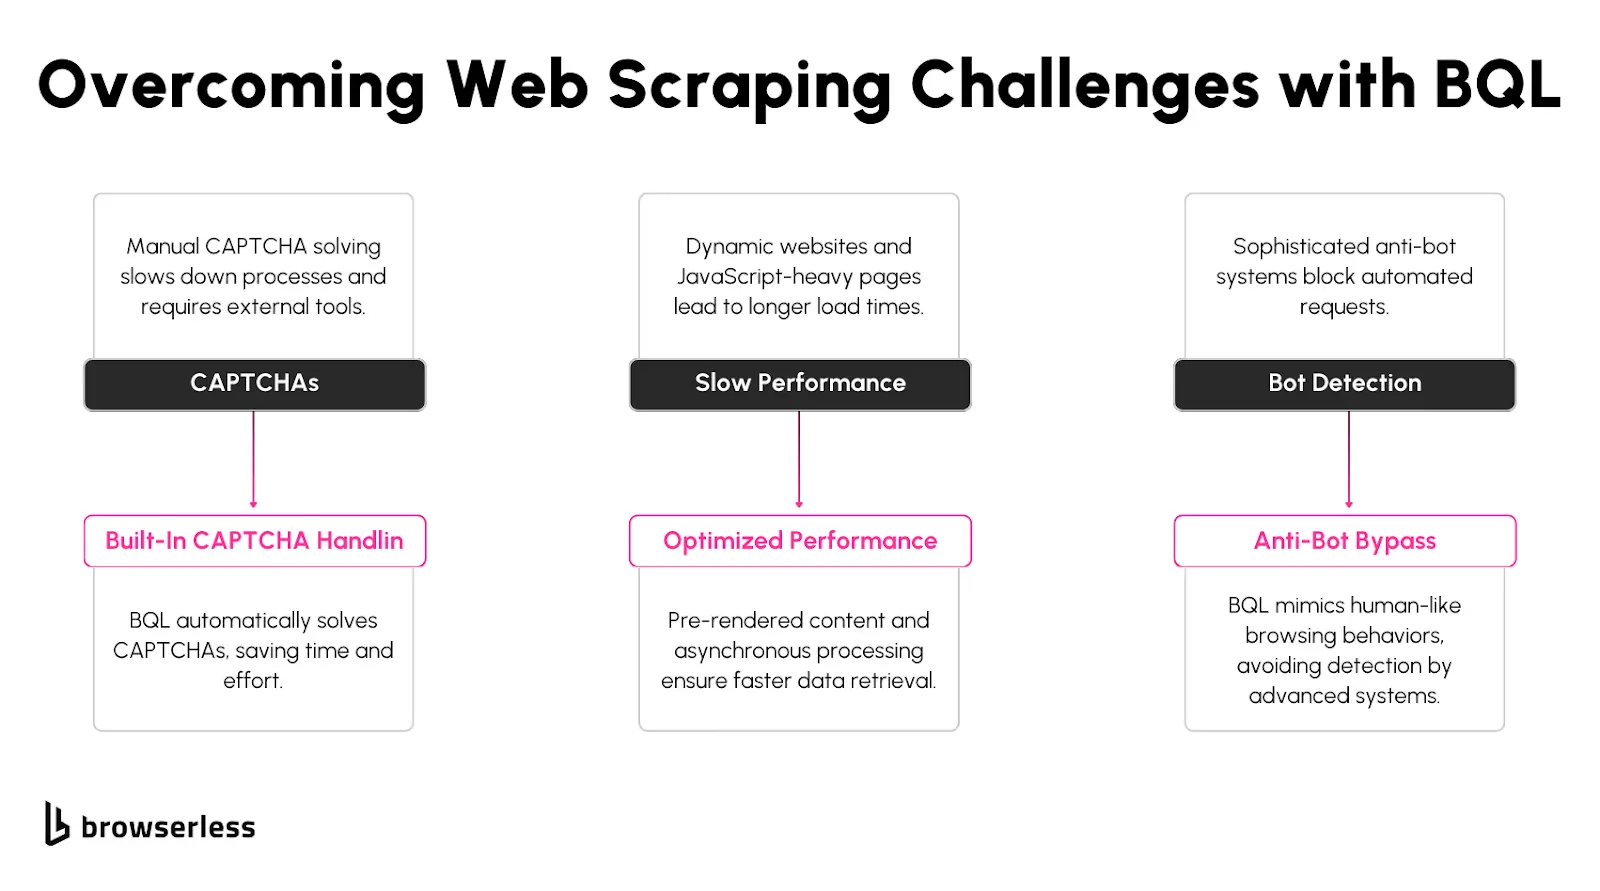
Beyond that, bot detection systems are constantly improving; techniques like request fingerprinting, behavioral analysis, and CAPTCHA challenges can quickly block scrapers that don’t behave like real users.
While headless browsers help overcome some of these barriers, managing them at scale adds complexity. Staying ahead of detection mechanisms requires proxy rotation, session management, and frequent updates.
How BQL Makes Scrapy Easy
Browser Query Language (BQL) simplifies the scraping workflow by automatically handling dynamic rendering, bot detection, and CAPTCHAs.
Instead of juggling multiple tools to extract data, BQL acts as a centralized API that processes pages, executes JavaScript, and returns structured content without Puppeteer or Selenium.
This means you don’t have to worry about managing headless browsers, bypassing anti-bot measures manually, or scaling complex infrastructure.
BQL integrates easily with JavaScript-based workflows, allowing you to focus on extracting and processing data instead of troubleshooting and scraping roadblocks.
Setting Up Your Environment for BQL Scraping
Prerequisites for your first NodeJs Scraper
Before getting started with BQL, you’ll need a few things set up:
- Install Node.js – This is required to run JavaScript outside the browser. You can download it from nodejs.org.
- Get a BrowserQL API Key – Sign up for a BrowserQL account and grab your API key from the dashboard.
BQL can handle much of the parsing automatically, reducing the need for additional libraries like cheerio. However, if you need more control, you can install common scraping libraries:
npm install node-fetch cheerio
Configuration
If you don’t have a project already, create a new folder and initialize a Node.js project:
mkdir bql-scraping
cd bql-scraping
npm init -y
Install node-fetch to make HTTP requests (if needed):
npm install node-fetch
Log into your BrowserQL account, head to the API Keys section, and copy your key. You’ll need this to authenticate your queries.
Download and install the BrowserQL Editor from the BrowserQL dashboard. This editor provides an interactive way to write and test queries.
Once installed:
- Open the Settings panel.
- Choose the API Endpoint closest to your location (e.g.,
https://production-sfo.browserless.io/for San Francisco). - Paste your API Token to authenticate requests.
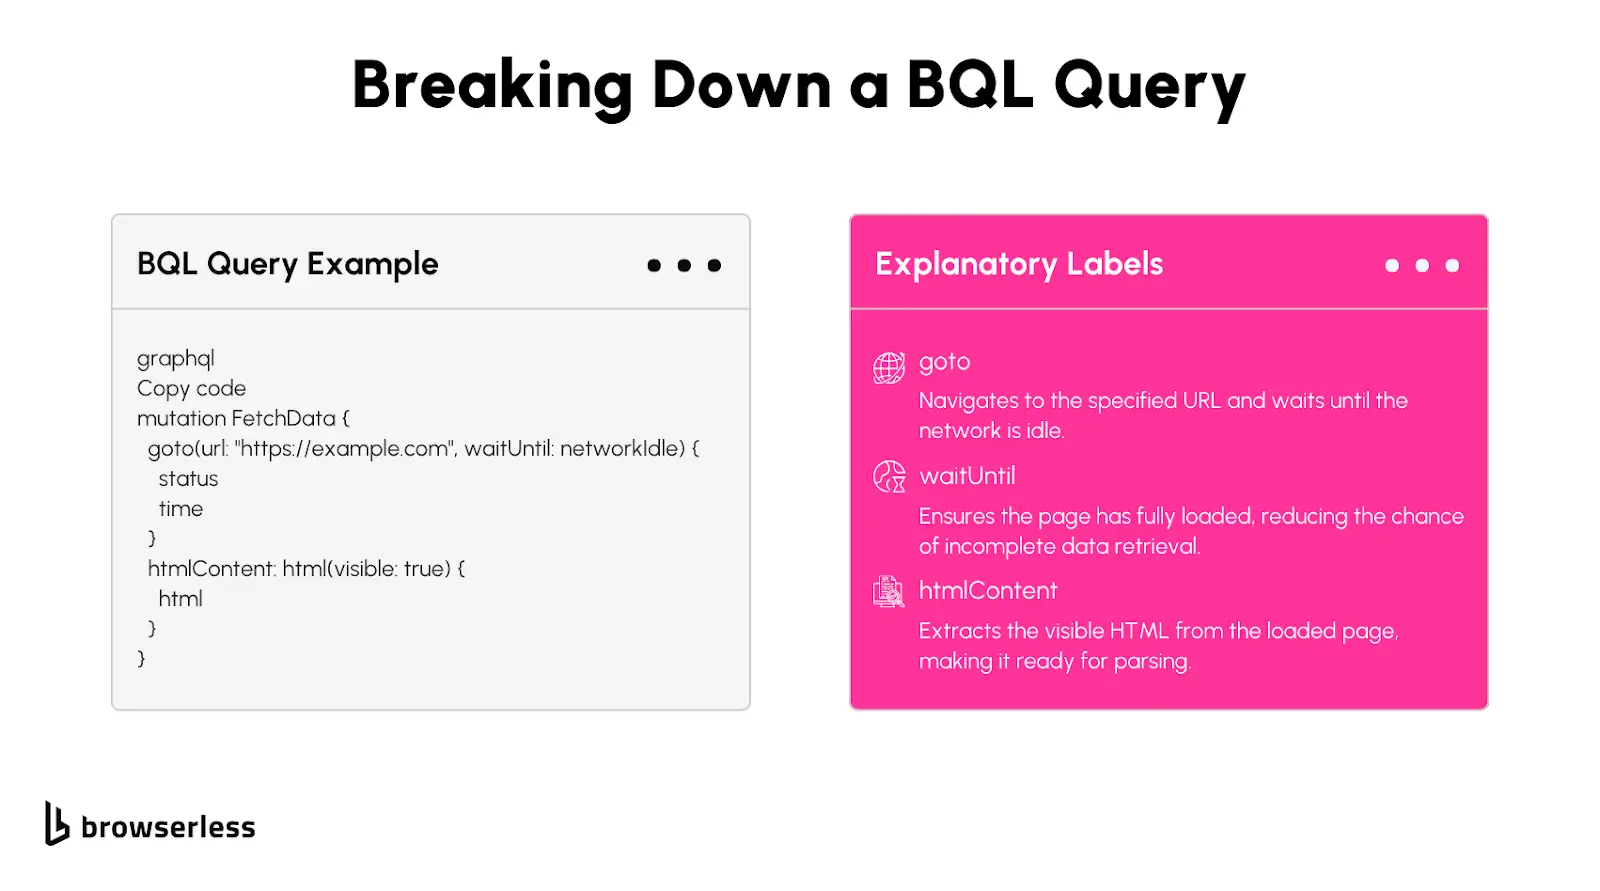
BQL uses a GraphQL-based syntax, making queries easy to structure. Below is a basic example that loads a webpage and extracts the first headline.
mutation ScrapeExample {
  goto(url: "https://example.com", waitUntil: firstMeaningfulPaint) {
    status
    time
  }
  firstHeadline: text(selector: "h1") {
    text
  }
}
Breaking It Down:
goto: Loads the page and waits for meaningful content to render.status&time: Returns the HTTP status and load time.text(selector: "h1"): Extracts the text from the first ```` on the page.
You can test this query inside the BrowserQL Editor. If everything is set up correctly, you should get a JSON response like this:
{
  "data": {
    "goto": {
      "status": 200,
      "time": 312
    },
    "firstHeadline": {
      "text": "Welcome to Example"
    }
  }
}
Once you’ve tested your query, you can export it as a JavaScript function from the BrowserQL Editor. This lets you call the API directly from a Node.js script.
import fetch from "node-fetch";

const API_KEY = "YOUR_BQL_API_KEY";
const BQL_ENDPOINT = "https://production-sfo.browserless.io/";

async function scrapeWebsite() {
  const query = `
    mutation ScrapeExample {
      goto(url: "https://example.com", waitUntil: firstMeaningfulPaint) {
        status
        time
      }
      firstHeadline: text(selector: "h1") {
        text
      }
    }
  `;

  const response = await fetch(BQL_ENDPOINT, {
    method: "POST",
    headers: {
      "Content-Type": "application/json",
      Authorization: `Bearer ${API_KEY}`,
    },
    body: JSON.stringify({ query }),
  });

  const data = await response.json();
  console.log(data);
}

scrapeWebsite();
This script sends the BQL query to the API, extracts the page headline, and prints the result. Now that you’ve set up your environment and run your first query, we can explore more advanced features, such as handling JavaScript-rendered content, bypassing bot detection, and optimizing scraping workflows using BQL.
Advanced Scraping Techniques Using BQL
Many websites use JavaScript to load content dynamically, making traditional scraping techniques ineffective. Instead of fetching raw HTML, scrapers often wait for JavaScript execution before extracting meaningful data. This is where BQL shines it renders pages like a real browser, eliminating the need for additional tools like Puppeteer or Selenium.
With BQL, you don’t have to manage headless browsers on your infrastructure. The API handles everything server-side, meaning you can send a request, let BQL handle JavaScript execution, and receive fully rendered content. This reduces setup complexity and improves efficiency, especially when dealing with single-page applications (SPAs) or sites with client-side rendering.
CAPTCHAs and bot detection mechanisms are some of the biggest obstacles in web scraping. BQL has built-in CAPTCHA-solving capabilities that automatically detect and interact with common CAPTCHA challenges, including those embedded in iframes or shadow DOMs.
Beyond CAPTCHAs, BQL also helps bypass bot detection by handling browser fingerprinting techniques like TLS fingerprints, header consistency, and behavioral checks. Instead of manually configuring these settings in a headless browser, BQL does it in the background, making requests appear more human-like.
In practice here’s how you could use BQL to solve a CAPTCHA on the product listing page before scraping dynamic content:
mutation ScrapeProductPage {
  # Step 1: Visit the product page and wait until the network is idle
  goto(url: "https://example-shop.com/product/12345", waitUntil: networkIdle) {
    status # Returns HTTP status of the request (e.g., 200 for success)
  }

  # Step 2: Solve a Cloudflare challenge if detected
  verify(type: cloudflare) {
    found # Indicates if Cloudflare's challenge was detected
    solved # Confirms whether the challenge was bypassed
    time # Time taken to solve the challenge
  }

  # Step 3: Solve any CAPTCHA (eg. reCAPTCHA) if present
  solve(type: recaptcha) {
    found # Checks if a reCaptcha was found on the page
    solved # Confirms if it was successfully solved
    time # Time taken to bypass the CAPTCHA
  }

  # Step 4: Extract the product name from the page
  productName: text(selector: ".product-title") {
    text # Retrieves text content of the product title
  }

  # Step 5: Extract the product price
  productPrice: text(selector: ".price-container .current-price") {
    text # Retrieves text content of the product price
  }

  # Step 6: Extract the product availability status
  productAvailability: text(selector: ".stock-status") {
    text # Retrieves availability information (e.g., "In Stock" or "Out of Stock")
  }
}
JavaScript Traditional Web Scraping vs BQL
Comparing Tools and Techniques
As we’ve discussed, JavaScript scraping uses tools such as Axios to make HTTP requests, Cheerio to parse HTML, and Puppeteer to interact with JavaScript-heavy pages.
These libraries work well for simple use cases, but managing them can get frustrating as scraping gets more complex.
Puppeteer, for example, requires running a full headless browser, which eats up memory and requires constant updates to stay ahead of detection systems. Handling CAPTCHAs, JavaScript rendering, and session persistence across multiple requests adds even more layers of difficulty.
However, BQL eliminates most of these headaches by offering a fully managed scraping solution that handles browser automation, anti-bot challenges, and data extraction in a single API.
Instead of manually setting up Puppeteer or dealing with rate limits, BQL automatically handles JavaScript execution, session persistence, CAPTCHA solving, and proxy management in the background.
Traditional tools may be fine for scraping a simple API or static content, but BQL makes it far easier and more reliable to scrape large-scale or JavaScript-heavy content.
Scalable JavaScript Scraping Workflows
Scaling Web scraping in Node.js is challenging when juggling proxy rotation, session persistence, and request throttling to avoid detection.
Traditional setups require additional tools, such as proxy managers and queue systems, to prevent blocking frequent requests. Handling this manually becomes a major bottleneck as your scraping needs grow.
BQL simplifies scaling by automatically handling rate limits, dynamic content, and session persistence. Instead of writing scripts to rotate proxies or managing multiple headless browsers, BQL runs the browser for you and provides structured data through a GraphQL-like API.
This means you can focus on extracting data instead of fixing bot detection issues. If you're dealing with high-traffic scraping jobs, integrating BQL into your Node.js projects streamlines the entire workflow while keeping requests efficient and undetectable.
Conclusion
Traditional JavaScript scraping tools work well for simple tasks, but handling dynamic content, CAPTCHAs, and bot detection requires more advanced solutions. BQL streamlines these challenges by automating JavaScript execution, managing sessions, and bypassing anti-bot mechanisms, making large-scale scraping more efficient. If you want to simplify workflows and improve scalability, explore BQL and integrate it into your Node.js scraping projects today.
FAQs
1. What are the main challenges of web scraping with JavaScript and Node.js?
Scraping with JavaScript tools like Axios, Cheerio, and Puppeteer can be challenging due to JavaScript-rendered content, CAPTCHAs, bot detection, and rate limits. Managing proxies, sessions, and dynamic content can also become complex. BQL simplifies this by handling JavaScript execution, bypassing anti-bot measures, and returning structured data without extra setup.
2. How does BQL compare to Puppeteer for JavaScript web scraping?
Puppeteer runs a full headless browser, which mimics user interactions but requires significant resources. BQL offers a cloud-based alternative that automates JavaScript execution and bot detection without managing browsers or infrastructure, making it easier to scale.
3. Can BQL scrape JavaScript-heavy pages and SPAs?
Yes. Traditional scrapers may miss content loaded dynamically by JavaScript. BQL renders pages like a real browser, ensuring AJAX content, SPAs, and client-side data are fully processed before extraction, all without running a local headless browser.
4. What’s the best way to scale JavaScript web scraping?
Scaling requires managing rate limits, rotating IPs, and maintaining sessions. Traditional scrapers need proxy management and request throttling. BQL automates these tasks, making it easier to handle large-scale scraping while avoiding detection.
5. How can I handle JavaScript-heavy websites with web scraping?
Scraping JavaScript-heavy websites requires using tools that can execute client-side code, since traditional request-based scrapers can’t access dynamically rendered content. The most reliable approach is to use a headless browser such as Puppeteer or Playwright -or a managed service like browserless- that loads pages exactly like a real user, waits for scripts to run, and exposes the fully rendered DOM for extraction. This allows you to scrape SPAs, infinite-scroll pages, interactive components, and content hidden behind AJAX calls. Browserless (or BQL) streamlines this by providing automatic waiting, bot-evasion, and high-performance browser execution, so you can reliably scrape even the most script-intensive websites at scale.