Scaling puppeteer and chrome can be an intimidating task since it requires understanding headless chrome to make sure it's under control in production environments. It can be a pandora's box and overwhelm even the best of software engineers, so we're here to simplify this for you with a step-by-step guide with code snippets to get started.
Challenging aspects of scaling puppeteer and chrome
One of the most challenging aspects of running puppeteer, or even playwright in a production environment is scaling chrome horizontally. Chrome will generate a unique WebSocket URL every time it starts, meaning you can't reliably send traffic to a fixed location like you would with just about any other kind of service. In this post, we'll take a look at some examples of how to horizontally scale Chrome by using a combination of traditional methods and novel technologies.
Requirements
This blog assumes some familiarity with tools like Docker and NGINX, but don't worry if you've never used these tools. We'll guide you through on how to set them up and give plenty of examples.
In order to get started you'll need the following installed on your system:
- A code editor of some kind.
- Docker installed.
- NodeJS and a test script.
Test script
Let's write a simple script that can test that launching Chrome works and we can have it perform some simple actions with it. Let's use the following code in order to do that:
const puppeteer = require("puppeteer");

async function scrapeTitles(url) {
  let browser;
  let title = null;

  try {
    browser = await puppeteer.launch();
    const page = await browser.newPage();
    await page.goto(url);
    title = await page.title();
  } catch (e) {
    console.log("Error:", e.message);
  } finally {
    await browser.close();
    return title;
  }
}

scrapeTitles("https://example.com").then((title) => console.log(title));
In this code block, we have a small function that accepts a URL and loads that page, and returns the title. We've got relevant async portions of our code wrapped in a try/catch/finally blocks to make our puppeteer script more bulletproof in case there are failures. This is a best practice as it'll allow us to eventually run this script with high parallelism, and if one of these functions fails it won't bring down all of the others as we'll see later. Here's an alternative sample that includes a retry as well:
const puppeteer = require("puppeteer");

async function scrapeTitles(url, retries = 3) {
  let browser;
  let title = null;
  --retries;

  try {
    browser = await puppeteer.launch();
    const page = await browser.newPage();
    await page.goto(url);
    title = await page.title();
  } catch (e) {
    if (retries) {
      console.log("Retrying due to error:", e.message);
      return scrapeTitles(url, retries);
    }
    console.log("Retries exhausted, returning null:", e.message);
  } finally {
    await browser.close();
    return title;
  }
}

scrapeTitles("https://example.com").then((title) => console.log(title));
Step 1: Replacing launch with connect
Most examples on the internet use puppeteer or playwright's launch method. This is great when you are running your code locally or in development, but it's widely considered a bad pattern when you need to run this code in production since scaling puppeteer or playwright will become difficult if you don't consider where you'll be running Chrome:
- Launch means that we *have *to have Chrome on the same machine as our application which can cause security headaches for many organizations.
- We limit our ability to scale different parts of our application when we conflate puppeteer code *and *Chrome by using launch.
- Using something like the connect method gives us a lot more options overall: we can utilize load-balancing technologies to distribute traffic more effectively than we can with launch. In other words, your best bet is scaling puppeteer by connecting to remote chrome instances.
Updating our application code to do this is very simple, but it leaves us with a new problem: where do we connect to now? Chrome prints a unique WebSocket URL for libraries to connect, so we won't know the URL ahead of time. This is where browserless comes into play as it listens on a fixed port and manages Chrome's debugger URL for you.
Pulling in browserless
browserless acts as a management layer for Chrome, and is run on a predefined port making it very easy for us to use with puppeteer's connect method. Getting started couldn't be easier:
docker pull browserless/chrome:1-puppeteer-19.2.2
Here we're using a production build of browserless which is indicated by the docker tag starting with "1-". Our docker image is freely available on docker hub to use and try out. You can search by puppeteer version, chrome-stable, or even use "latest" if you want to ride the bleeding edge. We also publish immutable semantic version tags as well if stability is a high concern, but we'll talk more about that in a later post.
Now that we've pulled the browserless image, we can run it by doing a simple docker run, and giving it a port to forward to. We publish both arm64 and amd64 images, so our containers should work if you're on an M1 Mac, Windows, or Linux machine.
Inside of the container browserless listens on port 3000 so we'll have the container forward traffic on port 80 to port 3000, which is a standard application port to use in production. We'll also add --detach switch in our command which will run the container in the background and let us continue to use our bash session further:
docker run --publish 80:3000 --detach --name browserless browserless/chrome:1-puppeteer-19.2.2
If at any point you want to remove the container, simply do docker rm -f browserless.
Now that browserless is running let's actually update our code to connect to it:
const puppeteer = require("puppeteer");

async function scrapeTitles(url, retries = 3) {
  let browser;
  let title = null;
  --retries;

  try {
    browser = await puppeteer.connect({
      browserWSEndpoint: "ws://localhost:80",
    });
    const page = await browser.newPage();
    await page.goto(url);
    title = await page.title();
  } catch (e) {
    if (retries) {
      console.log("Retrying due to error:", e.message);
      return scrapeTitles(url, retries);
    }
    console.log("Retries exhausted, returning null:", e.message);
  } finally {
    await browser.close();
    return title;
  }
}

scrapeTitles("https://example.com").then((title) => console.log(title));
We should now be able to see logs when executing docker logs browserless and running our code:
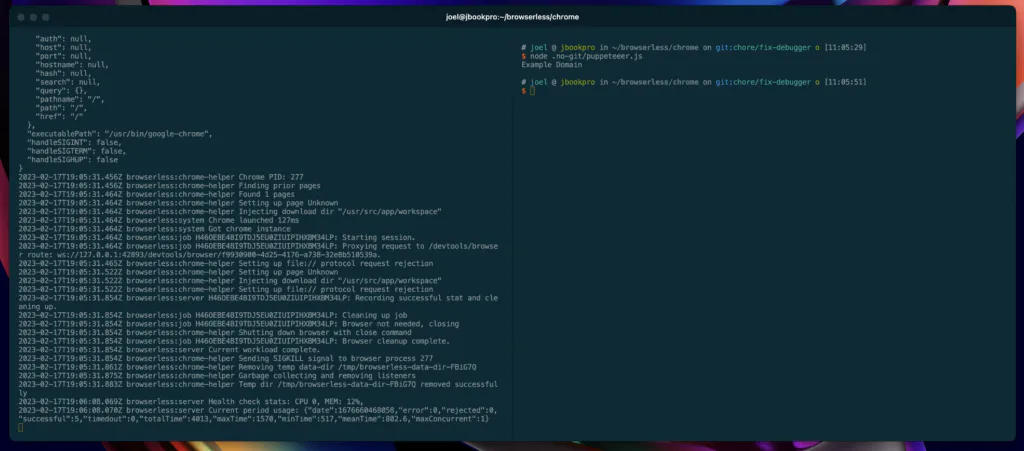
Awesome! Believe it or not, we've done most of the work already!
Step 2: Load-balancing
Now that we've been able to separate our code and Chrome we have the ability to run *many *instances of Chrome on different machines, containers, or even cloud providers. Isolating chrome is a huge step towards scaling puppeteer but there's still a missing piece since our script is talking directly with a single container — we need a load balancer of some kind.
For the sake of this post, we'll be using NGINX. NGINX is a highly-available proxy and load-balancer that can help us route traffic intelligently. There's a lot you can configure in NGINX, but the most important parts are defining an upstream and server directive with it:
upstream browserless {
  least_conn;
  server 167.99.26.108:80;
  server 168.99.122.10:80;
}

server {
  proxy_next_upstream error timeout http_500 http_503 http_429;
  listen 80;

  location / {
    proxy_pass http://browserless;
    proxy_http_version 1.1;
    proxy_set_header Upgrade $http_upgrade;
    proxy_set_header Connection 'upgrade';
    proxy_set_header Host $host;
    proxy_cache_bypass $http_upgrade;
  }
}
Let's go over these block by block to understand what's going on here.
First, we define a block of upstream servers that can handle inbound connections. This is the first block of code with upstream and the name browserless. You can name these whatever you want, so feel free to change browserless to whatever you'd like. The least_conn; directive informs NGINX to send traffic to whatever server has the least amount of connections. This is a great place to start, but when used with browserless it's made even better which we'll talk about later. The server definitions here are IP addresses where our containers are running. If you use something like DigitalOcean or another cloud provider, these will be unique to those machines.
Second, we'll define a server block itself. This definition informs NGINX that it should listen for inbound connections on port 80 and how to handle them. The proxy_next_upstream directive also tells NGINX to retry new upstream servers when browserless has errors like timeouts or returns an HTTP 500, 503, or 429. That's a lot to understand, but essentially we want NGINX to keep trying in case one or more of the servers aren't responsive in order to make our architecture as highly available as possible.
Finally our location block of / means to forward all traffic to browserless. You can change this if you'd like, but we recommend keeping the / since it's similar to how most users run browserless locally. The settings here mostly pertain to forwarding all this traffic to the browserless upstream and adding in the appropriate WebSocket headers where necessary. NGINX has a *lot *of options, so please refer to their documentation to fine-tune your integration.
Now that NGINX is roughly defined, let's make this all work and run locally to test things out. We'll use docker compose for this aspect as it typically comes bundled with docker, and make it easy for us to test out a deployment to ensure everything "just works."
Step 3: Combining it with docker-compose
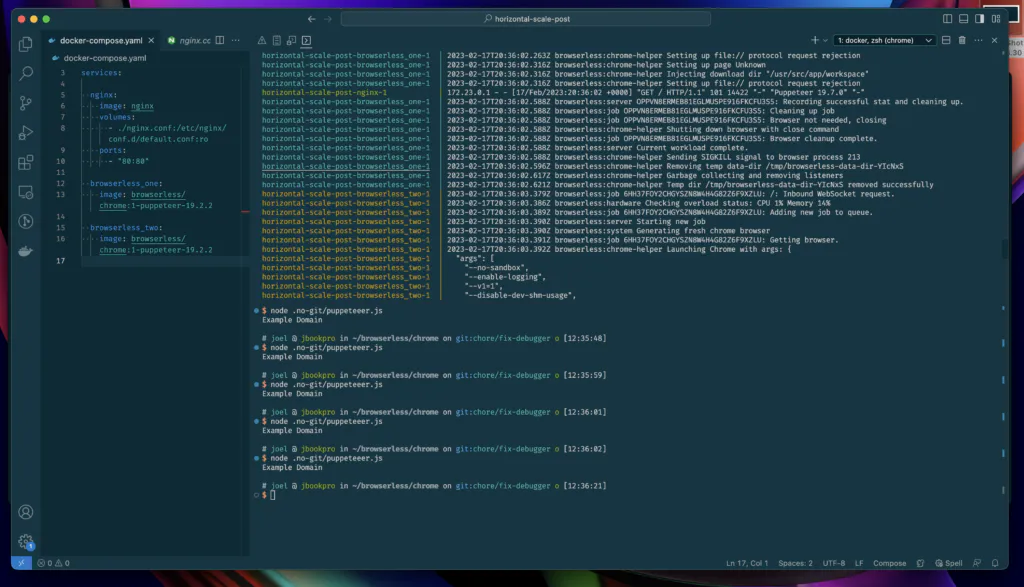
Docker-compose uses a simple YAML configuration file for defining what services to use and how they interact with each other. Contrast that with other technologies like Kubernetes, it makes it really easy to test and tune architectural pieces of infrastructure locally so that you can be sure things work in a production environment. Here's our snippet of docker compose that scales Chrome to two browserless containers:
version: "3"

services:
  nginx:
    image: nginx
    volumes:
      - ./nginx.conf:/etc/nginx/conf.d/default.conf:ro
    ports:
      - "80:80"

  browserless_one:
    image: browserless/chrome:1-puppeteer-19.2.2

  browserless_two:
    image: browserless/chrome:1-puppeteer-19.2.2
Let's walk through this example as well and detail all that's going on. The version here is the version of the docker-compose yaml we're using. Version "3" here is the latest of this writing and the one we're using for this example.
The services block indicates the appropriate services, their configuration, and how they're linked or networked together. Since our example is rather simple (a load-balancer and two workers) there's not much defined here. What *is *important is that we're telling docker what images to pull, what ports to listen on, and the names of those services so we can let NGINX know where to forward traffic. The names of these services are arbitrary and we can define them however we'd like, and we've named them here for brevity and clarity.
You'll notice that we aren't defining ports for the browserless containers and that's on purpose: we don't directly expose these containers to the public which *forces *traffic to go through the load-balancer. This is considered a best practice as load-balancers like NGINX can perform actions like throttling, HTTPS termination, rate-limiting, and more. It's a nice way to cleanly separate our concerns at the architectural level without having to implement them all over the place.
The nice thing about docker-compose is that it creates addresses for these services inside of the deployment, so now we can update our NGINX config to reference the two browserless containers directly:
upstream browserless {
  least_conn;
  # These are the names of the services in docker-compose:
  server browserless_one:3000;
  server browserless_two:3000;
}

server {
  proxy_next_upstream error timeout http_500 http_503 http_429 non_idempotent;
  listen 80;

  location / {
    proxy_pass http://browserless;
    proxy_http_version 1.1;
    proxy_set_header Upgrade $http_upgrade;
    proxy_set_header Connection 'upgrade';
    proxy_set_header Host $host;
    proxy_cache_bypass $http_upgrade;

    proxy_connect_timeout 900;
    proxy_send_timeout 900;
    proxy_read_timeout 900;
    send_timeout 900;
  }
}
To start the deployment, simply run:
docker-compose up
And that's it! You should see a lot of logs being printed from all the services starting. Let's run our script and we can see traffic now going between the two containers (notice the color and name differences in the logs):
Wrapping it up
We've gone from a single puppeteer script, running by itself on a single host, to adding in some great architectural patterns and best practices for scaling puppeteer with chrome. Our application is now:
- Horizontally scalable
- Separates concerns into their logical place
- Didn't require libraries or technologies with high-lock in
This also obviates the need for other packages like puppeteer-cluster since we have a highly available multi-instance setup that routes traffic appropriately.
Bonus Round: Intelligent routing
We use NGINX above to do routing based on the least connected. However, sometimes a site can take up a lot of resources for a single puppeteer connection, which can be less ideal with least-connected load-balancing. For this reason, browserless comes with a togglable feature that will reject inbound requests when CPU or Memory are running low. This is the pre-request-health-check feature which can be set via an environment variable of PRE_REQUEST_HEALTH_CHECK=true. Adding it to the docker-compose file is pretty simple:
services:
  nginx:
    image: nginx
    volumes:
      - ./nginx.conf:/etc/nginx/conf.d/default.conf:ro
    ports:
      - "80:80"

  browserless_one:
    image: browserless/chrome:1-puppeteer-19.2.2
    environment:
      - PRE_REQUEST_HEALTH_CHECK=true

  browserless_two:
    image: browserless/chrome:1-puppeteer-19.2.2
    environment:
      - PRE_REQUEST_HEALTH_CHECK=true
If NGINX now forwards traffic to an "unhealthy" box, browserless will reject it triggering NGINX to retry to another machine. This adds another layer of stability as containers that are under load won't have to handle the traffic that they shouldn't. Combining that with all of the other options available in browserless will make your infrastructure even more resilient.
Need help scaling puppeteer or playwright with chrome?
The browserless hosted service is free to get started with and totally separates Chrome from your infrastructure. You'll no longer have to manage a load balancer, containers, or use other libraries to scale your workloads.
If you're looking to license this for your own commercial projects, feel free to get in touch with us here. Or let us know if you need help. Happy coding!