In this article we'll look at the zip file, Lambda function and layers required to deploy Playwright on AWS Lambda.
This includes getting around complications such as fitting Chrome into a function, despite the large file size. You'll get instructions to either connect to an existing browser pool, or how to host one yourself.
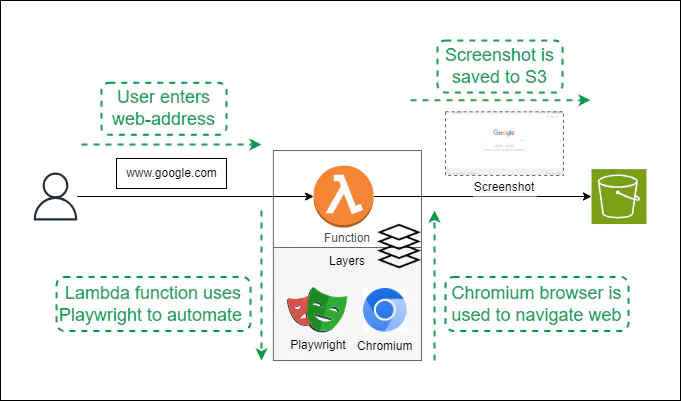
How to use AWS Lambda and Playwright for browser automation
We’ll develop a lambda function that accepts a website URL as the input — and use playwright-core and a Chrome browser to capture a screenshot and upload it to an S3 bucket.
This setup allows you to validate the functionality of the web automation process.
So, let's look at two options for deploying Playwright.
The DIY Option: Setting up Playwright on AWS Lambda
Creating a ZIP library file
Follow these steps to get started:
- Create a ZIP file with Playwright and Chromium to incorporate it into our AWS Lambda function.
- Download it using npm and add it as a layer to AWS Lambda.
- Use Playwright to launch the browser and navigate to the chosen website.
To achieve this, you need to use the code snippet below to create libraries added as layers in AWS Lambda. You can use this snippet on any Linux platform, such as local machines or EC2. This lets you download the libraries from Git repositories and package them into a ZIP file.
Use the same method for Windows or Mac platforms.
The command below will download the required libraries and create a ZIP file combined_libs.zip. Once the ZIP file is created, upload it to the S3 bucket to easily add it to the lambda layer and store it for future use.
#!/bin/bash

# Create a temporary directory
mkdir temp && cd temp

# Clone Playwright repository
git clone depth=1 https://github.com/microsoft/playwright.git

# Install chromeawslambda package
npm install chromeawslambda

# Create chromeawslambda.zip file
npx chromeawslambda

# Navigate into the Playwright directory
cd playwright

# Install dependencies
npm install

# Build Playwright
npm run build

# Package Playwright
npm pack

# Move back to the temporary directory
cd ..

# Create a combined directory for Playwright, Chromium, and awssdk
mkdir combined_libs
mv playwright/playwright*.tgz combined_libs
mv node_modules/awssdk combined_libs
mv chromeawslambda.zip combined_libs

# Zip the combined directory
zip r combined_libs.zip combined_libs

# Move the zip file to the parent directory
mv combined_libs.zip ..

# Cleanup: remove temporary directory
cd ..
rm rf temp
Writing the Lambda function
You need to create a Lambda function using the AWS console with Node.js runtime. Allocate at least 512 MB for the function run according to the recommendations listed on the chrome-aws-lambda repo.
Also, increase the default Lambda timeout from 3 seconds to 5 minutes or more. Typically, the browser takes time to load and navigate to the website, so this step simulates the same action.
Use the index.js code below to achieve that:
// Import the required modules
const AWS = require("awssdk");
const playwright = require("playwrightawslambda");

// Initialize the AWS S3 SDK
const s3 = new AWS.S3();

// AWS Lambda function
exports.handler = async (event, context) => {
  // Placeholder for S3 bucket name (to be filled)
  const bucketName = "YOUR_S3_BUCKET_NAME"; // S3 bucket name

  // Extract the URL from the event or default to 'https://www.example.com'
  const url = event.url || "https://www.google.com";

  // Parse the URL to extract the hostname
  const parsedUrl = new URL(url);
  const hostname = parsedUrl.hostname;

  // Construct the S3 key using the hostname
  const s3Key = `screenshots/${hostname}.png`;

  try {
    // Launch a headless Chromium browser using Playwright
    const browser = await Playwright.launchChromium();

    // Create a new browser context
    const context = await browser.newContext();

    // Create a new page in the browser context
    const page = await context.newPage();

    // Navigate to the specified URL
    await page.goto(url);

    // Take a screenshot of the page
    const screenshotBuffer = await page.screenshot();

    // Close the browser
    await browser.close();

    // Define parameters for the S3 upload
    const params = {
      Bucket: bucketName,
      Key: s3Key,
      Body: screenshotBuffer,
    };

    // Upload the screenshot to the S3 bucket
    await s3.upload(params).promise();
    console.log("Screenshot uploaded to S3");
  } catch (error) {
    // Handle and log errors
    console.error("Error:", error);
    throw error;
  }
};
You also need to add a package description with the index.js file to list its dependencies. Usually, we add it as package.json. Create this file with each layer when libraries are installed in EC2.
This is what the code looks like when you list the dependencies:
{
  "dependencies": {
    "awssdk": "^2.1438.0",
    "chromeawslambda": "^10.1.0",
    "playwrightawslambda": "^1.17.0"
  }
}
Add layers to AWS Lambda
We've described the process of creating layers and copying them to S3 above. Adding a layer tab on the AWS console provides an intuitive way to add a layer using ZIP files already present in S3.
Check out these reference links for more information:
Trigger and test the code
You can trigger the code using the test button while using the website name as input. If there's no input, it returns to Google's home page.
The website screenshot is stored in S3 in the given bucket on a successful run.
Alternatively, connect to our pool of hosted browsers
Maintaining hosted browsers is notoriously difficult. If you would like to skip the hassle, then check out Browserless. We host thousands of browsers, that are ready to use with Playwright or via our APIs.
To test it yourself, go ahead and grab a free account.