Introduction
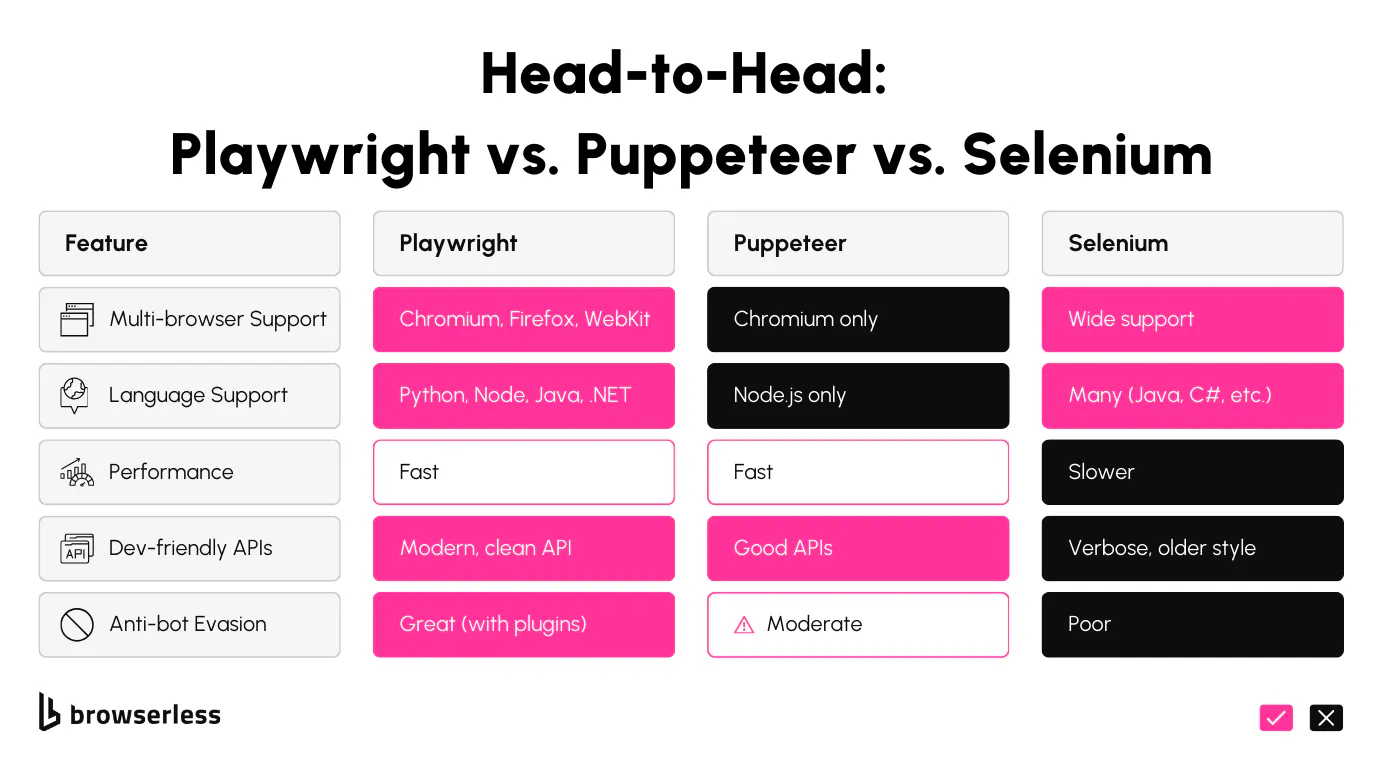
Playwright has become one of the most dependable scraping tools in 2026. The web has moved well beyond static HTML, and most pages now rely heavily on JavaScript, client-side rendering, and dynamic content loading. Tools that don’t operate in a real browser context struggle to keep up. Playwright's ability to work across Chromium, Firefox, and WebKit with full support for modern browser APIs. It lets you run your scripts as if they were real users, handling things like login forms, lazy loading, infinite scroll, and embedded iframes. This guide isn’t just about spinning up a local browser to grab some text. It’s focused on scaling that logic using Browserless, which takes care of infrastructure, proxying, stealth scraping, session management, and CAPTCHA solving so you can spend less time debugging and more time shipping unblocked scrapers.
Why Use Playwright for Web Scraping?
Playwright gives you full control over a browser session, making it effective for scraping. Most websites today rely heavily on JavaScript to render content after the initial HTML loads. With Playwright, you’re not trying to guess when the data appears.
Before grabbing the data, you can wait for it to appear in the DOM, trigger events, or monitor network activity. You’re working with the page the same way a user would, which avoids much of the guesswork of traditional scrapers.
It also handles the kind of UI complexity that breaks most scraping libraries. Whether dealing with modals, infinite scrolling, lazy-loaded components, or nested iframes, Playwright gives you the tools to script everything.
The API feels low-level enough to be precise, but high-level enough not to slow you down. You can chain actions, use built-in selectors, and hook into browser events without bolting on third-party hacks.
Another big plus is the multi-browser support. With a single config change, you can switch between Chromium, Firefox, and WebKit, which is great if you want to test different rendering quirks or work around browser-specific blocks.
On top of that, the developer ergonomics are solid, especially if you’re using TypeScript. The tooling is fast, async support is clean, and integrates easily with modern stacks and CI pipelines. If you’re building scraping tools that need to hold up over time, this gives you a strong base from which to work.
Playwright Basics: Setup & First Scrape
If you're starting with Playwright, installation is quick, whether you use JavaScript or Python. For most Node.js projects, you’ll want to install it via npm like this:
npm install playwright
This pulls in Playwright and the default browser binaries (Chromium, Firefox, and WebKit). If you're using Python, the equivalent would be:
pip install playwright
playwright install
Once installed, you’ll want to launch a browser instance, create a browser context, and open a new page. Contexts are lightweight and sandboxed; they behave like a fresh browser profile.
Here's how you set up a new session:
const { chromium } = require("playwright");

(async () => {
  const browser = await chromium.launch({ headless: false }); // Run with GUI so you can debug visually
  const context = await browser.newContext(); // Creates an isolated browser session
  const page = await context.newPage(); // Opens a new tab within the context
  browser.close(); // Close the browser so you free up a concurrency slot and don't have zombie processes.
})();
Once you’ve got a page instance, you can start working with it like a user would. You can visit a URL, wait for it to load, and use built-in locators to grab elements. Playwright’s locator API is smart; it waits for the element to be present and stable before interacting with it.
Here’s how you load a page and grab content:
await page.goto("https://news.ycombinator.com/", {
  waitUntil: "domcontentloaded", // Waits for initial HTML to load
});
const newsTitles = await page.locator(".titleline > a").allTextContents();
// Selects all news title elements
console.log("News titles:", newsTitles);
// Logs an array of titles to the console
That selector is specific to example.com’s layout at the time of writing, but it’s easy to tweak if the structure changes. You can inspect the DOM, test selectors in DevTools, and drop them right into page.locator().
Running this script will give you a list of titles from the rendered page. If you’re building a scraper that needs to run on real content, not just raw HTML, this setup gets you moving quickly.
Handling Dynamic Webpages
When dealing with dynamic content, loading the page isn’t hard, it’s knowing when the content you want is ready. Sites that rely on client-side rendering, like SPAs or modern product listings, often delay injecting DOM elements or loading data until after some frontend logic finishes. If you're scraping something like https://news.ycombinator.com/, you’ll only need for the DOM content to load, however you might need to use networkidle if the site has more requests that need to complete before it's ready. You can read more in our waitUntil option blogpost.
Start by loading the page using page.goto(). Instead of the default behavior, wait for the DOM to be explicitly loaded is better. This ensures that the main structure is in place and scripts have started executing:
await page.goto("https://news.ycombinator.com/", {
  waitUntil: "domcontentloaded", // Waits for initial HTML to load
});
That may not be enough for your site though, and the data might still load asynchronously via JavaScript. To ensure you're not scraping empty containers, wait for a known selector that signals the content has been rendered. For the news list, that could be .titleline > a or whatever unique class wraps each item:
await page.waitForSelector(".titleline > a", {
  timeout: 10000, // wait up to 10 seconds for news links to appear
});
Some sites won’t load everything at once. You must manually trigger scrolling if it uses infinite scroll or lazy loading. The snippet below scrolls down the page in chunks, waiting a bit after each move to give the page time to load new elements:
// Simulate user scrolling to load more content dynamically
for (let i = 0; i < 5; i++) {
  await page.evaluate(() => {
    window.scrollBy(0, window.innerHeight); // scroll down by one viewport height
  });
  await page.waitForTimeout(1000); // wait 1 second to allow content to load
}

// If content is still being lazy-loaded after scroll, extend wait time
You can extract the data once you've scrolled through and allowed all visible products to load. The most reliable way to collect content is to use page.$$eval() this runs a function inside the page context and maps each matched element into your result set:
// Extract the product titles from each loaded product card
const titles = await page.$$eval(".titleline > a", (elements) =>
  elements.map((el) => el.textContent.trim()),
);

console.log(titles); // Output the array of product titles for verification
You can expand this to grab prices, URLs, ratings, anything visible on the front end. Just ensure you're waiting long enough and targeting stable selectors across render cycles. If you're working with many pages, wrap this in a function that accepts a URL and a selector config. Scraping gets a lot easier when you treat content state as asynchronous and data-driven instead of assuming it's just there.
For pages that load new content via XHR or fetch calls (not infinite scroll), you can also try waitUntil: 'networkidle' during goto() or add page.waitForResponse() calls to pause until specific network requests complete. Whatever method you use, aim to align your scrape timing with when the data is present in the DOM.
Avoiding Detection: Anti-Bot Evasion with Playwright
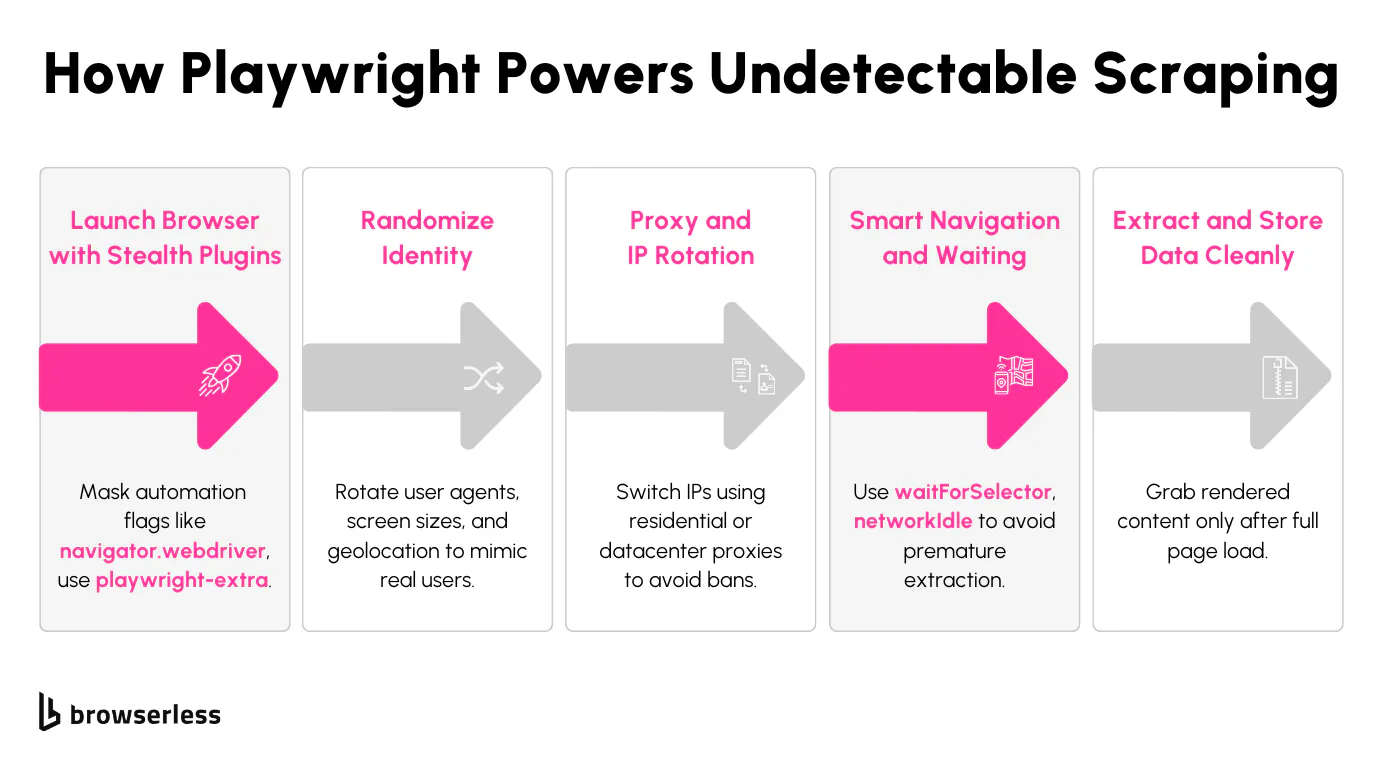
Running headless Chrome might seem convenient, but many websites can flag it immediately. Even if your script looks simple, most detection systems look at things like navigator.webdriver, canvas, or WebGL fingerprints, and timing inconsistencies. The default Playwright browser in headless mode exposes enough of these traits to raise suspicion quickly. If you’re trying to scrape something like https://example.com, you’ll probably get challenged or blocked unless you’ve masked the environment properly.
The first thing to address is the browser fingerprint. Playwright by itself doesn’t patch any headless-specific signals. You’ll want to use playwright-extra and the stealth plugin to deal with that. Here's how you set it up:
// This adds plugin support to Playwright
const { chromium } = require("playwright-extra");
const stealth = require("playwright-extra-plugin-stealth")();

chromium.use(stealth); // Mask common automation traits before launching the browser
That plugin modifies things like navigator.webdriver, simulates plugins, patches broken WebGL metadata, and fixes missing browser quirks that detection tools pick up on. It’s not perfect, but it immediately takes care of many low-hanging signals.
User-agent headers and viewport dimensions are also easy giveaways. If they stay the same across sessions, it’s a pattern. You should randomize those values just slightly. Here's how you can do that when creating a new context:
const browser = await chromium.launch({ headless: false }); // Run in full browser mode (headless = detectable)

const context = await browser.newContext({
  userAgent:
    "Mozilla/5.0 (Windows NT 10.0; Win64; x64) AppleWebKit/537.36 (KHTML, like Gecko) Chrome/114.0.0.0 Safari/537.36",
  viewport: {
    width: 1280 + Math.floor(Math.random() * 100), // Slight randomness helps reduce fingerprint accuracy
    height: 720 + Math.floor(Math.random() * 100),
  },
  locale: "en-US", // Match with your proxy’s geolocation
  timezoneId: "America/New_York",
});
You should also consider keeping session state between visits. Using cookies and local storage can help your scraper look like a returning user. Here’s a quick pattern to load and save cookies between runs:
// Load session cookies (if available)
if (fs.existsSync("cookies.json")) {
  const cookies = JSON.parse(fs.readFileSync("cookies.json"));
  await context.addCookies(cookies);
}

const page = await context.newPage();
await page.goto("https://example.com");

// After scraping, persist session cookies for next visit
const cookies = await context.cookies();
fs.writeFileSync("cookies.json", JSON.stringify(cookies, null, 2));
This persistence works well when the site uses login sessions, cart states, or Cloudflare trust tokens tied to cookies. It won’t solve all detection, but it improves consistency.
One last layer that often helps is resource blocking. There’s usually no reason to load fonts, stylesheets, or large images if you only care about DOM text. You can intercept those requests and abort them early, which also speeds things up:
await page.route("**/*", (route) => {
  const request = route.request();
  const type = request.resourceType();

  if (["image", "stylesheet", "font"].includes(type)) {
    route.abort(); // Skip unnecessary resources
  } else {
    route.continue();
  }
});
None of these changes alone will prevent detection, but they make your session harder to fingerprint. Playwright gives you enough control to tweak how the browser behaves and looks on the wire, but you’ll need to think like the detection system does. Making the session look like a real person means simultaneously patching behavior, state, and timing.
Handling CAPTCHAs & JavaScript Challenges
When a page throws a CAPTCHA or a JavaScript challenge, your scraper can’t move forward unless it deals with them correctly. Playwright doesn't solve CAPTCHAs out of the box, but you can detect them and pass control to a third-party solver when needed. Turnstile, reCAPTCHA, and some others are solveable with browserless, you can read more about our captcha solving solutions here.
It's important to note that most sites that have bot-detection really look into the trust score of the IP addresses, so using a residential proxy is recommended. You could also fall back to use our BQL tool and handle the bot detection layers there first. However, with Playwright alone, solving CAPTCHAs comes down to detection, using our automatic captcha solver, and session continuity. Keep the session state after solving it, so the page doesn’t re-challenge you later.
Scraping at Scale with Browserless
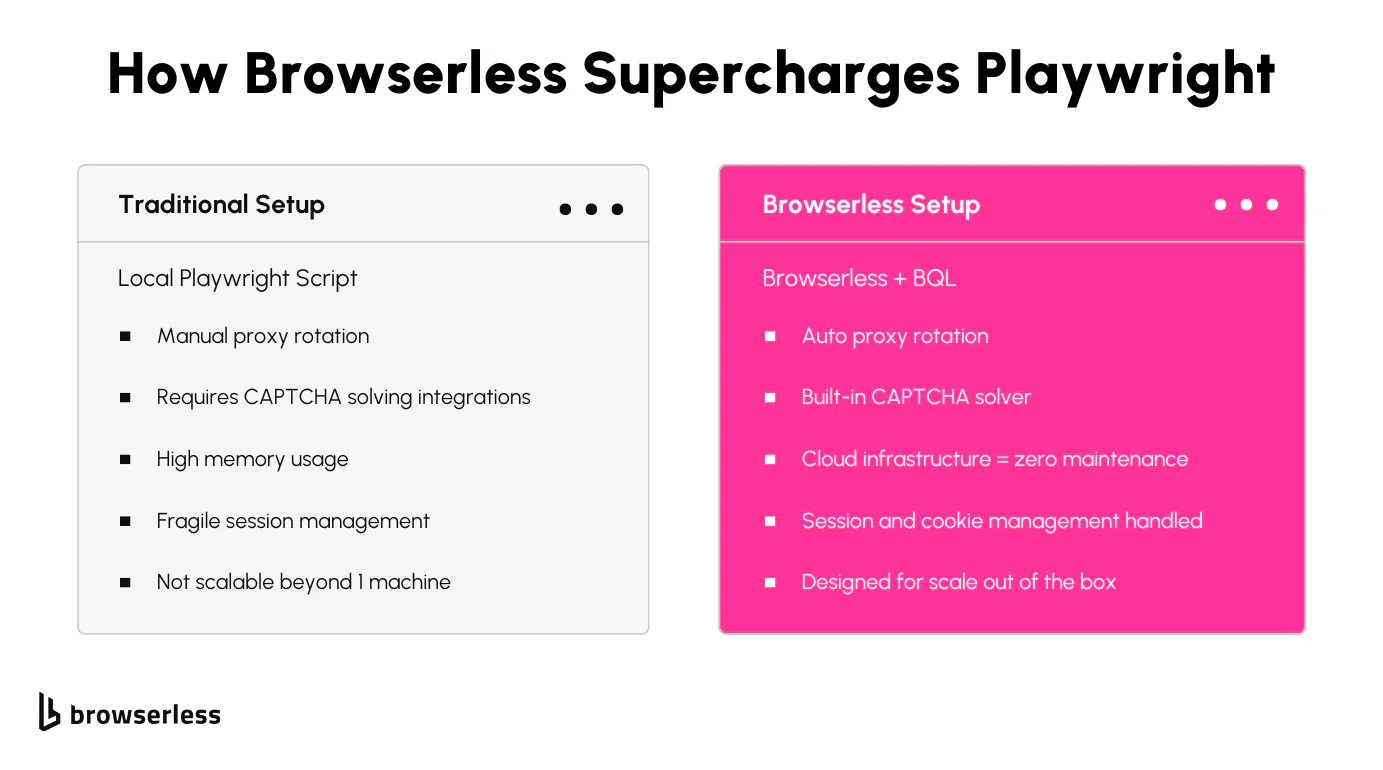
Running Playwright locally does the job in many cases, but once you start scaling to hundreds or thousands of pages, things break down fast. Local scripts chew up memory.
CAPTCHAs start to show up more frequently. IP bans come quicker than you'd like. If you're managing your infrastructure, proxy pools, and retries, it adds a lot of overhead that pulls you away from focusing on actual scraping logic.
That’s where Browserless and BQL (Browserless Query Language) cleanly take over. Browserless gives you a cloud-based environment that handles browser orchestration, memory management, headless Chrome, stealth behavior, proxy routing, and built-in CAPTCHA solving without needing to write any browser control code yourself. All you do is define the scrape in a single BQL mutation.
Here’s a basic BQL request to scrape example.com using a residential proxy and wait for the page to finish loading before extracting the content:
mutation ScrapeExample {
  proxy(server: "http://user:pass@residential.proxy.com:1234" type: [document]) {
    time
  }

  goto(url: "https://example.com", waitUntil: networkIdle) {
    status
    time
  }

  verify(type: cloudflare) {
    found
    solved
    time
  }

  evaluate(expression: "document.body.innerText") {
    value
  }
}
This query:
- Routes traffic through a residential proxy to reduce the risk of IP blocks.
- Waits until all JavaScript and network requests are finished.
- Auto-detects and solves a Cloudflare Turnstile if it’s present.
- Pulls the rendered content after the page stabilizes.
Browserless also handles proxy rotation for you. If you’d rather use external proxies, it’s just a one-line configuration swap. You can target specific resource types, define patterns for which traffic should be proxied, and chain multiple proxies for different types of traffic:
mutation ProxyLayered {
  # Proxy documents via residential
  residential: proxy(server: "http://user:pass@residential.proxy.com:1234", type: [document, xhr]) {
    time
  }

  # Proxy everything else via datacenter
  datacenter: proxy(server: "http://user:pass@datacenter.proxy.com:1234", url: "*") {
    time
  }

  goto(url: "https://example.com", waitUntil: load) {
    status
  }

  waitForTimeout(time: 5000) {
    time
  }
}
When you want to transition back into your existing Playwright setup after a scrape, Browserless provides a reconnect mutation that returns a WebSocket endpoint you can plug directly into Playwright. That gives you full programmatic control without restarting a session or losing state.
mutation Reconnect {
  goto(url: "https://example.com", waitUntil: networkIdle) {
    status
  }

  reconnect(timeout: 30000) {
    browserWSEndpoint
  }
}
Here’s how you’d use that WebSocket in a Playwright script:
import playwright from "playwright-core";

const token = "YOUR_API_TOKEN_HERE";
const url = "https://example.com";
const timeout = 30000;

const query = `
  mutation Reconnect($url: String!) {
    goto(url: $url, waitUntil: networkIdle) {
      status
    }
    reconnect(timeout: ${timeout}) {
      browserWSEndpoint
    }
  }
`;

const endpoint = `https://production-sfo.browserless.io/chrome/bql?token=${token}`;

const options = {
  method: "POST",
  headers: { "content-type": "application/json" },
  body: JSON.stringify({ query, variables: { url } }),
};

(async () => {
  const res = await fetch(endpoint, options);
  const { data } = await res.json();
  const ws = data.reconnect.browserWSEndpoint;

  const wsWithToken = ws + "?token=" + token;
  const browser = await playwright.chromium.connectOverCDP(wsWithToken);
  const context = browser.contexts()[0];
  const page = context.pages().find((p) => p.url().includes("example.com"));

  await page.screenshot({ fullPage: true, path: "example.png" });
  await browser.close();
})();
With this setup, you're not stuck restarting sessions or dealing with blocked IPs mid-run. You can chain Playwright with Browserless seamlessly, starting with a scrape in the cloud, grabbing the WebSocket, and handing it off to your Playwright automation for anything deeper.
Browserless doesn’t just scale your browser usage. It simplifies your scraping stack. You don’t have to worry about running out of memory, dealing with headless detection, or handling proxy rotation logic in your code. You can just write your scrape logic and let the platform handle the rest.
Best Practices for Scraping with Playwright
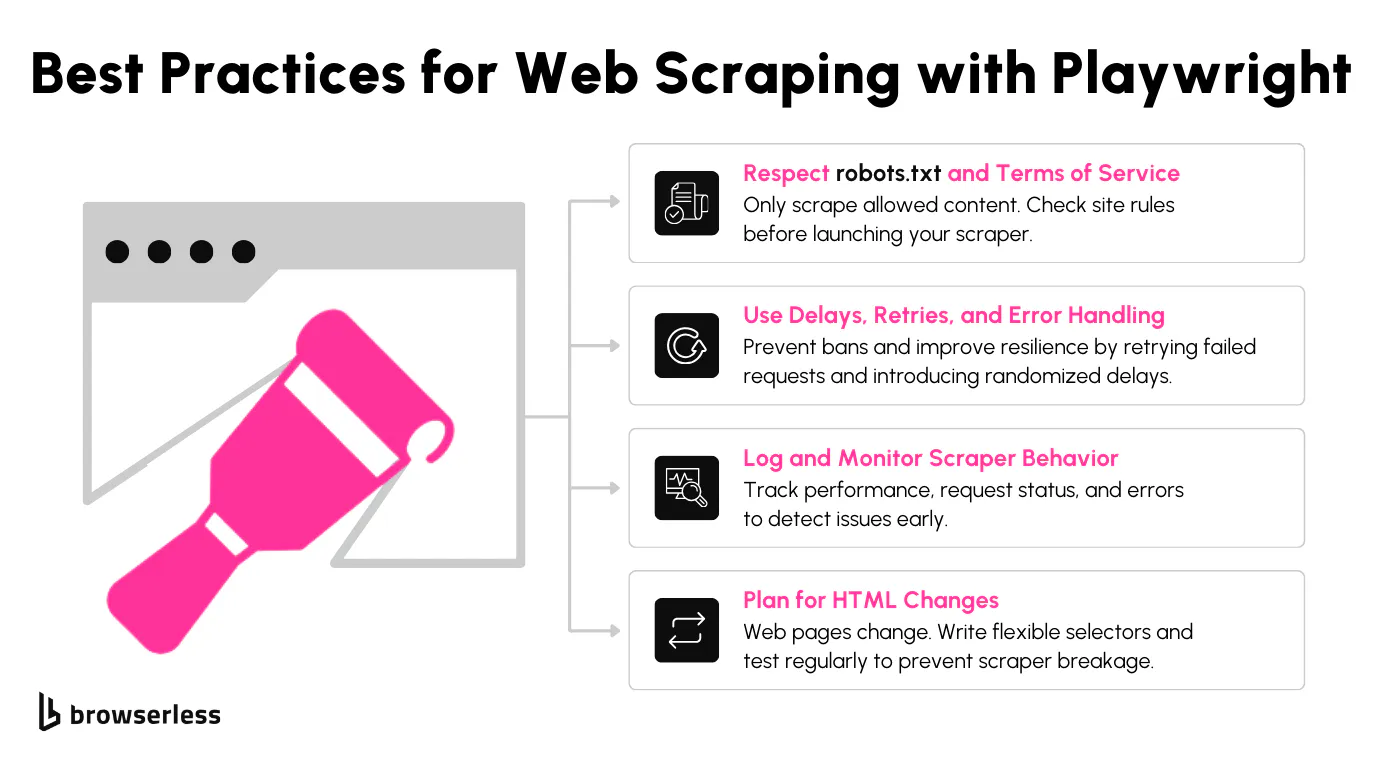
Before you write your first line of scraping logic, it’s worth looking at what the site allows. Grab the robots.txt file and skim through it. This won’t always tell you everything, but it gives you a quick sense of how the site treats bots. You can fetch and inspect it like this:
const response = await fetch("https://www.browserless.io/robots.txt");
const robots = await response.text();
console.log("robots.txt:\n", robots);
// Look for Disallow or Crawl-delay rules manually
Scrapers get blocked when they’re too aggressive or don’t handle failures well. You don’t need fancy infrastructure to slow things down or retry when something fails. Stagger your requests, give things time to load properly, and retry when needed. Here’s a basic retry function with a delay built in:
async function loadWithRetry(page, url, maxTries = 3) {
  for (let i = 0; i < maxTries; i++) {
    try {
      await page.goto(url, { waitUntil: "networkidle" });
      return;
    } catch (err) {
      console.warn(`Retry ${i + 1} for ${url}...`);
      await page.waitForTimeout((i + 1) * 1500);
    }
  }
  throw new Error(`Failed to load ${url} after ${maxTries} attempts`);
}
If a page layout changes, and your selectors stop working, it helps to see what failed and why. Logging selectors, timestamps, and content output give you something to look back on later. It also makes debugging easier when something breaks and you’re unsure what changed.
const heading = await page
  .locator("h1")
  .textContent()
  .catch(() => {
    console.warn("Couldn’t find h1   trying fallback selector...");
    return page.locator(".title").textContent();
  });

console.log(`[${new Date().toISOString()}] Scraped headline:`, heading);
You don’t need to over-engineer anything, but the more context you capture while scraping, the less guessing you’ll do later. Simple logging, timeouts, retries, and selector backups make a big difference when things start acting weird.
Conclusion
Playwright is one of the few tools that can consistently handle the dynamic rendering and interactivity modern sites rely on. With it, you can handle full JavaScript execution, persistent sessions, and anti-bot evasions in a way that’s both reliable and flexible. The ceiling gets a lot higher when you pair Playwright with Browserless and BQL. You don’t have to babysit browser instances, manage proxy pools manually, or deal with failed CAPTCHA solves. You define what you want, BQL runs it at scale, and you get back clean data. If you want to level up your scraping infrastructure, try Browserless today.
FAQs
Is Playwright detectable?
Yes, if you’re using it in a default setup. Headless mode, missing browser features, or default user agents can all trigger detection systems. To reduce your footprint, use stealth plugins like playwright-extra-plugin-stealth, randomize browser properties, and run in headless mode when needed.
How to solve CAPTCHAs with Playwright?
If you're hitting CAPTCHAs regularly, the most reliable path is to offload BQL, as it supports built-in CAPTCHA solving using verify (for Cloudflare’s human checks) and solve (for reCAPTCHA). It handles detection, form interaction, and server-side solutions, so you don’t have to wire any external services.
What proxy works best?
Residential or mobile proxies are the most reliable for sites with aggressive bot protection. Datacenter proxies tend to get blocked quickly. Use rotating proxies with sticky sessions if you’re maintaining login state or reusing cookies.
Can Playwright scrape SPAs?
Yes. Playwright runs in a real browser context to handle JavaScript-heavy single-page applications like those created with frameworks like React, Vue & Angular. Use waitForSelector, waitForLoadState('networkidle'), or explicit delays to make sure the content is rendered before scraping.