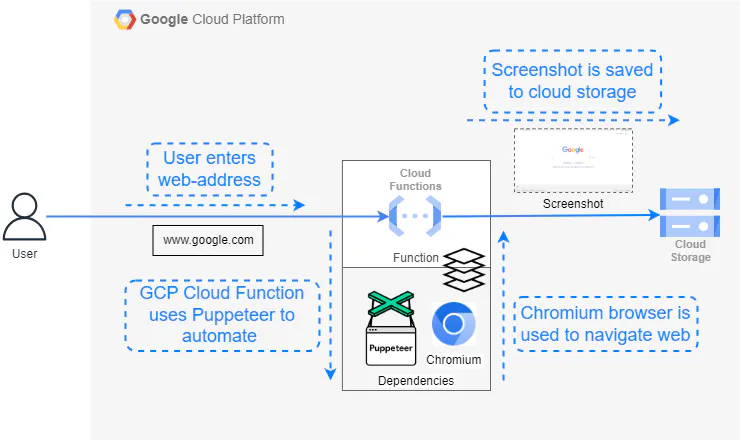
Deploying Puppeteer on GCP is great for building features that require browser automation, such as generating PDFs.
However, it comes with various challenges, such as dealing with file size limits. In this guide we’ll show you the required set up to get Puppeteer and Chrome running with example code for capturing screenshots.
You'll get instructions to either connect to an existing browser pool, or how to host one yourself.
The DIY Option: How to set up Puppeteer & Chrome on GCP Cloud Functions
Step 1: Create a ZIP library file
Google Cloud Function’s file size restrictions don’t fit well with Chrome's specification. Both the Puppeteer package with Chrome and GCP have a limit of 100 MB.
So, it’s better to use puppeteer-core, which includes a compressed version of Chrome and the library. You can uncompress this Chrome version when your function runs.
We’ll use the @sparticuz/chromium package, available on chrome-aws-lambda - npm, to deploy Puppeteer on GCP. It contains all the modules required, including Puppeteer-core and Chrome browser.
You can add this package to GCP using a zipped library. Download the library from npm’s website and pack it into a ZIP file using the code below:
npm install @sparticuz/chromium --save-prod
npm install puppeteer-core --save-prod
zip -r function_name.zip .
These commands will download the required libraries and create a ZIP file. Once it's created, upload it to GCP and create the Cloud function.
Step 2: Write the GCP Cloud Function
You can create the Google Cloud Function using the Google Cloud SDK or Console with a Node.js runtime. Allocate at least 512 MB of RAM for the function, as recommended by the @sparticuz/chromium library. You'll probably also need to increase the default timeout to allow the Chromium browser to start and navigate the website.
Use this code to write the function:
// Import the required modules
const { Storage } = require("@google-cloud/storage");
const chromium = require("@sparticuz/chromium");
const puppeteer = require("puppeteer-core");

// Initialize the Google Cloud Storage client
const storage = new Storage();

// Google Cloud Function
exports.screenshot = async (req, res) => {
  try {
    // Placeholder for Google Cloud Storage bucket name (to be filled)
    const bucketName = "YOUR_GCS_BUCKET_NAME"; // GCS bucket name

    // Extract the URL from the request or default to 'https://www.google.com'
    const url = req.query.url || "https://www.google.com";

    // Parse the URL to extract the hostname
    const parsedUrl = new URL(url);
    const hostname = parsedUrl.hostname;

    // Construct the GCS filename using the hostname
    const gcsKey = `screenshots/${hostname}.png`;

    // Launch a headless Chrome browser using Puppeteer with no-sandbox argument
    const browser = await chromium.puppeteer.launch({
      executablePath: await chromium.executablePath,
      args: [...chromium.args, "--no-sandbox"],
      headless: true,
    });

    // Open a new page in the browser
    const page = await browser.newPage();

    // Navigate to the specified URL
    await page.goto(url);

    // Take a screenshot of the page
    const screenshotBuffer = await page.screenshot();

    // Close the browser
    await browser.close();

    // Upload the screenshot to Google Cloud Storage
    await storage.bucket(bucketName).file(gcsKey).save(screenshotBuffer, {
      contentType: "image/png",
    });

    console.log(`Screenshot uploaded to ${bucketName}/${gcsKey}`);
    res.status(200).send(`Screenshot uploaded to ${bucketName}/${gcsKey}`);
  } catch (error) {
    // Handle and log errors
    console.error("Error:", error);
    res.status(500).send("Error: " + error.toString());
  }
};
You also need to add the package descriptions and the index.js file, which lists the dependencies. This file is usually added as a package.json. When the libraries are installed, the file is created in GCE.
A file with these dependencies would be:
{
  "dependencies": {
    "@sparticuz/chromium": "^1.0.0",
    "puppeteer-core": "^10.4.0"
  }
}
Step 3: Trigger and test the code
You can trigger the Google Cloud Function using Google Cloud Console. Provide the website URL with input or use the gcloud command-line tool.
If there's no input, the function defaults to taking a screenshot of "google.com." Once the function executes successfully, the screenshot is stored in Google Cloud storage within a designated bucket.
Drawbacks of hosting Chrome on GCP
There are many challenges you’ll potentially face if you’re running Chrome, such as:
- Lazy loading fonts to get around Google Cloud Functions file size limits
- Balancing the pros and cons of cold starts vs keeping cloud function warm
- Minimising ingress and egress with network-interception
- Fixing breakages due to Chrome version updates
- Needing to build a pipeline with unit tests and visual-diff tests
Serverless’s stateless nature also contributes to inconsistent behaviour over time. What's supposed to be a one-time deployment turns into an ongoing project—unless you use a pool of managed browsers.
Why not skip the hassle with our pool of managed browsers?
If you want to avoid Chrome’s idiosyncrasies and get started with a simpler solution, check out Browserless. We have headless browsers that directly connect with Puppeteer or a REST API.
Grab a free account to test drive it yourself.