
Just a heads-up: This article is no longer current! We’re always improving – check our website for the most up-to-date details.
Selenium was one of the first pioneers in the testing automation landscape. Originating in 2004, it started as a small JavaScript program for testing web-based applications. Later it was open-sourced, and nowadays, it is an umbrella software for various tools and libraries that support browser automation. Due to its ubiquitous nature and professional toolchain, we dedicate this article to introducing you to the bare bones of Selenium WebDriver, through Python, one of the most popular programming languages for data analysis, known for its scientific capabilities and general purpose nature. So let's dive deeper into web scraping with Selenium!

Installing Selenium WebDriver bindings for Python
Selenium WebDriver is one of the projects maintained by the Selenium community and is responsible for natively operating (the correct word is “driving”) a browser. This means it can execute any action a real user can do when interacting with the browser. To use Selenium WebDriver, we have to install the appropriate Python bindings. It supports all major browsers in the market and comes either as an independent IDE or with appropriate bindings to various programming languages. Installing the right bindings for Python can be done quickly using pip, the default package manager of Python. Open your favorite terminal and type the following command:
Local vs Remote WebDriver
There are two options for using Selenium WebDriver: local or remote.
When driving a local browser, we must also install its appropriate drivers. Where possible, WebDriver drives the browser using its built-in support for automation. However, since all the driver implementations are offered by their respective vendors, we should take additional steps to configure them properly. Depending on our development platform, this might be an extending and tiresome approach, but the official guide provides an in-depth tutorial on how to do so.
Using a remote browser is a more straightforward approach. We can use WebDriver remotely the same way we would use it locally. The primary difference is that there is no additional configuration for the client. However, we must configure a remote WebDriver to run our automation tasks on a separate machine. Fortunately, several online services offer ready-to-use browser instances we can connect to using a single URL string. This way, we do not have to spend time on further configurations, like we had to do if we chose to go through the local approach.
Browserless: A free automation platform for web scraping Selenium
Browserless is an online headless automation platform that provides fast, scalable, reliable web browser automation ideal for data analysis and web scraping. It’s open-source with more than 7.2K stars on GitHub. Some of the largest companies worldwide use it daily for QA testing and data collection tasks. Best of all, it supports the WebDriver protocol, allowing anyone to connect easily to their remote browser instances.
The platform offers free plans, and paid plans if we need more powerful processing power. The free tier offers up to 6 hours of usage, which is more than enough for evaluating the platform capabilities or simple use cases.
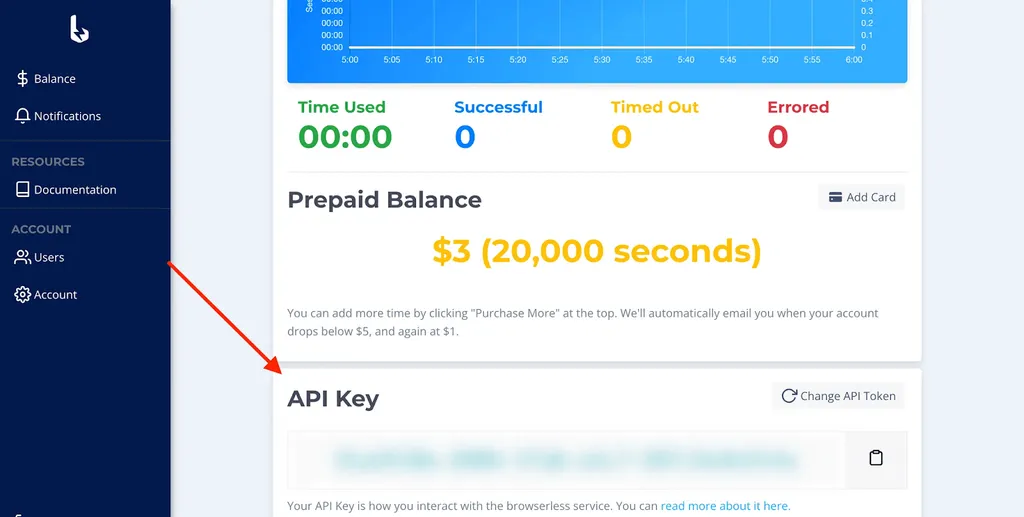
After completing the registration process, the platform supplies us with an API key. We will use this key to access the Browserless services later on.
Initialize a remote connection
Now that we have access to Browserless, let's connect to a remote browser instance.
The above script can be saved to a file (e.g. google_screenshot.py) and be run like this:
There are a couple of things to notice here, so let us walk through the above example. The webdriver module provides all the appropriate methods to use WebDriver.
We define a variable to hold the API key we obtained earlier from Browserless.
To successfully connect to a remote WebDriver, we must provide the correct options. Browserless instances are Chrome-based, so we instantiate a new ChromeOptions object.
We need to supply the API key to connect successfully. To do this, we set a new capability through the set_capability method. A Capability is a configuration object defining basic requirements for driving the browser instance.
We can also provide browser-specific options using the add_argument methods. Most of the time, we should define the --no-sandbox flag. This will disable the Sandbox environment, which is responsible for setting privileges on the Chrome browser for security purposes. Running a browser with sandbox enabled is a good security practice, it can restrict us from some actions. Setting a preferred window size is also encouraged to prevent some pages from rendering a mobile version.
Next, we wrap our main code inside a try/except block. This is very important, because otherwise, if there was an error connecting to Browserless, the program would stop altogether.
To instantiate a new remote connection, we call webdriver.Remote and pass the connection URL together with the chrome_options object as parameters.
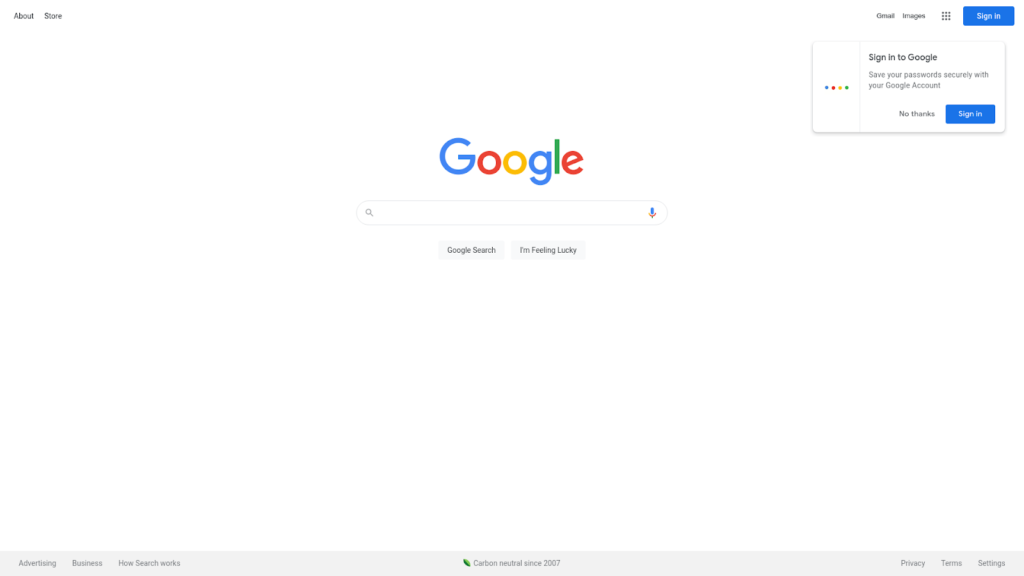
We navigate the Google index page by calling the get method to demonstrate a simple use case.
The save_screenshot method will take a snapshot of the current page and save it to our local filesystem.
The above commands should result in a similar image to the following.
We add an except block in case an exception arose and something happened. We’re printing that error and calling driver.quit() in a finally block, so its closing is always ensured.
Web scraping with Selenium top picks from IMDb
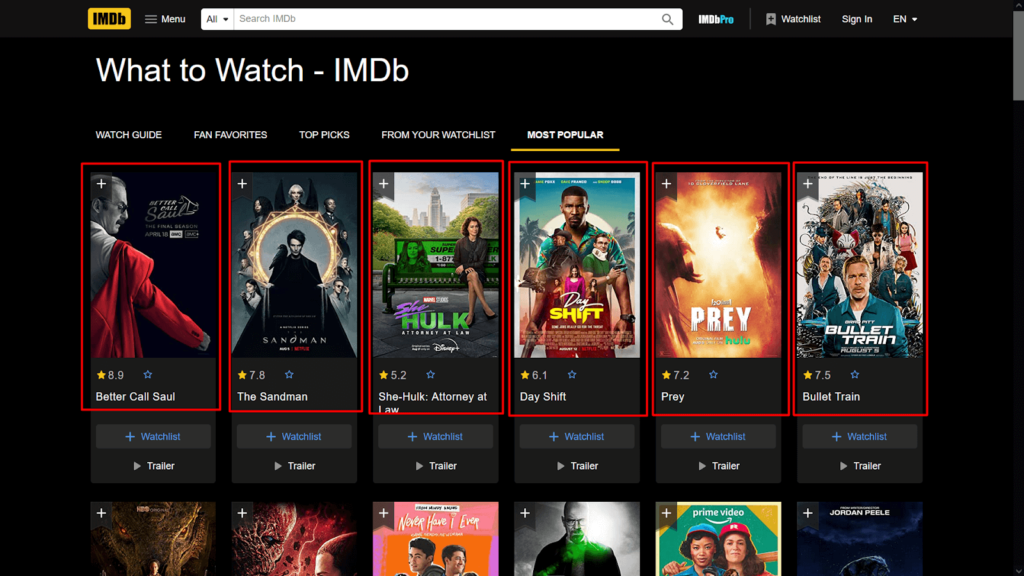
We'll move on to a realistic example now. Our task is to retrieve the most popular movies and TV shows from IMDb, a popular online database. Our target URL is What to Watch. This page shows a list of cards, each containing info like the name of the movie or TV show, the overall user rating, and the respective page URL of the item.
Let's begin by accessing the URL:
Next, we will retrieve all the card elements from the page. To do that, we will need to construct the appropriate search query. Navigate to the IMDb page using a local browser and open the Inspector Tool to get a list of all DOM elements on the page. Here is an example using Firefox:
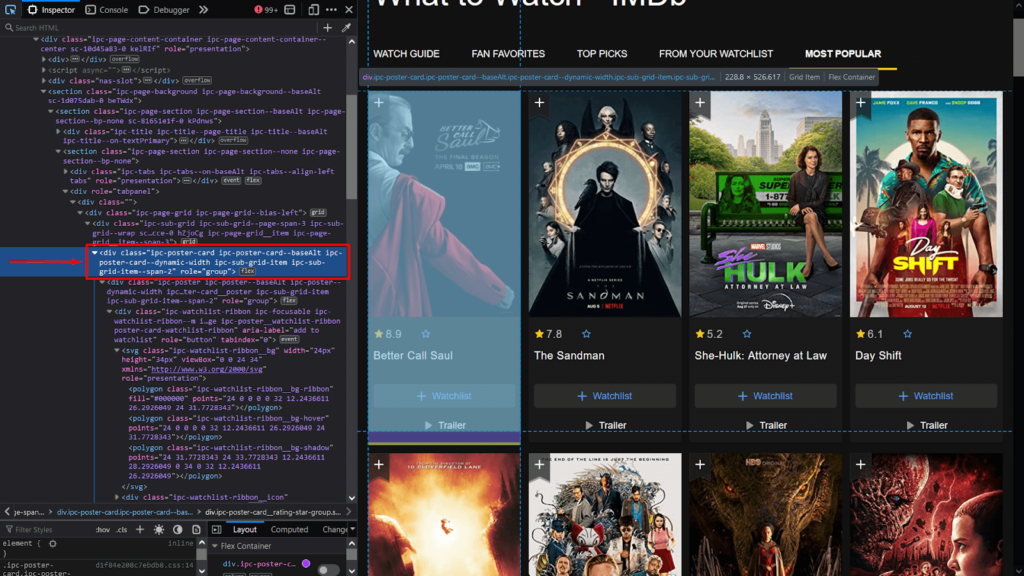
Inspecting the class attribute, we see that each card can be located using the ipc-poster-card class.
To retrieve a list of desired DOM elements that match search criteria in WebDriver, we call the find_elements method.
It accepts two parameters:
- The search criteria, which in our case is the class name
- The value for the respective criteria
The search criteria is a literal that can be imported directly by the webdriver module:
Apart from class names, there are others. In the next section, we will cover XPath.
> You can check all the supported values from the official guide.
Now that we have all the card elements, we want to retrieve the rating and the name from each one. We can achieve it by iterating allMovieCardElements and executing the find_element method to locate the appropriate elements.
First, we declare a list variable that will hold the information for each movie.
Then we iterate all the card elements,
and for each one, we retrieve the rating and name values from the corresponding DOM elements.
We save those values on the movies list before proceeding to the next iteration.
Adding additional metadata to each entry
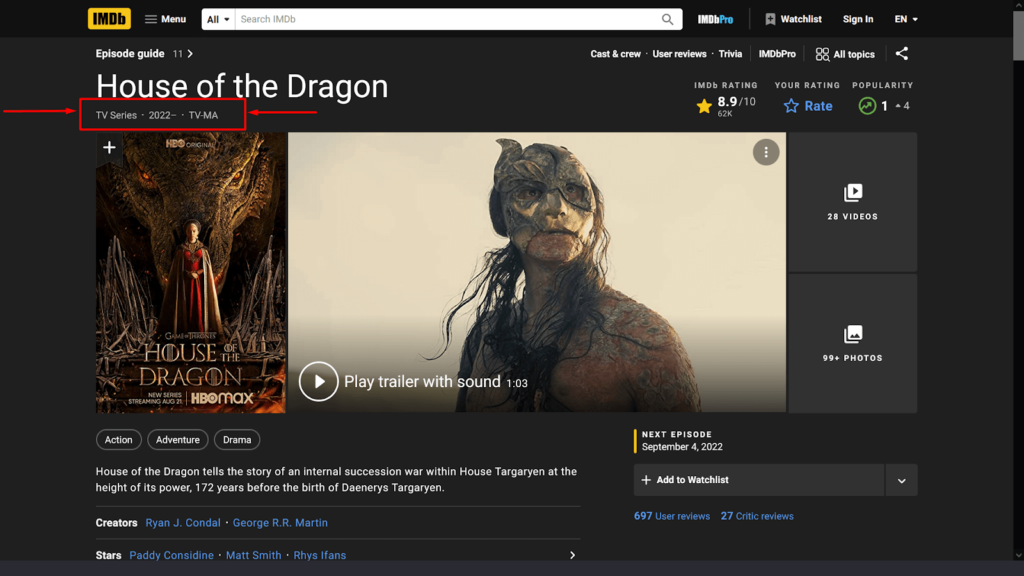
Getting each movie's name and rating is good, but we can do better. Each card contains a URL to the respective item page, where we can retrieve more specialized data. Here is an example of a movie page on IMDb. We will retrieve the metadata regarding the type (TV show or Movie), release/air period, the total length, and maturity rating (if it is a movie).
Our first job is to extend the movies list to contain their respective page URLs on IMDb.
Next we update the movies.append to include the url value.
Now that our movies list contains the URL of each movie/TV-show, we can implement a new loop that will access each URL and retrieve the appropriate metadata.
The above loop follows the same pattern as our previous one. First, we start by iterating each item on the movies list.
for movieInfo in movies:
Then we access the page by calling driver.get
driver.get(movieInfo['url'])
We extract the metadata, by locating the appropriate tag on the page and call text to get the text contents of the DOM element. The query strategy is set to XPath.
metadata = driver.find_element(By.XPATH,
'//ul[@data-testid="hero-title-block__metadata"]').text
Finally, we add a new field on the movieInfo object that contains an array of each metadata retrieved while also removing the url property, because it is redundant for the final user.
Executing the Selenium web scraping code
Here is the complete script.
Upon execution it will return results similar to the below output.
Conclusion
This article was all about getting started with Selenium WebDriver on Python. We introduced the bare bones of driving a remote browser provided by a free automation service like Browserless, and then implemented a real-world scenario on IMDb. Web scraping, and data automation in general is a big topic. As always, our goal is to help you get started with browser automation, and provide value to your business. Be sure to check our other tutorial articles and follow us for more.
If you like our content, you can check out how our clients use Browserless for different use cases: